Thursday, October 29, 2009

What's For Breakfast?

This week there's a Breakfast Recipe Swap going on over at Life as Mom. My camera is down for the count right now until I get new batteries for it, so I'm recycling a couple of previous posts for the party.


First up is sweet and creamy (non-instant) oatmeal with raisins and brown sugar--cooked in the microwave, it's 4 minutes, tops, from pantry to table.

Number two on the list is the fresh Blackberry Freezer Jam I made this summer...


...and last but certainly not least Buttermilk Biscuits made from scratch.

Enjoy the recipes, and for even more, drop in at the recipe swap and follow the links!

Until next time, good cooking, and good eating!

Thursday, October 22, 2009

You'll Want to Eat Every Crumb of This Easy Crumb Cake


Today's recipe is one that's brand new to me, but it's so easy and so tasty that I know I'll be adding it to my regular recipe repertoire (!). I found it at the Pantry Party recipe swap hosted (hostessed?) by Jane from The Thrifty Countrywoman.

This recipe is one of Jane's own contributions; it definitely fits the pantry party criteria of using common pantry/stockpile ingredients, and my criteria of being quick, easy, and delicious.

Ingredients:

  • 2 c brown sugar
  • 2 1/2 c flour
  • 1/2 t salt
  • 1/2 c butter or margarine
  • 1 t cinnamon
  • 1/2 c chopped nuts 1
  • 1 c milk
  • 1 T baking powder

Mix together brown sugar, flour, and salt. Cut in butter or margarine until the mixture is like coarse meal or bread crumbs.

Measure one cup of the crumb mixture and set aside.

To the remaining mixture, add baking powder and milk. Spread into a greased or cooking sprayed 13 x 9 inch pan. (The batter while be similar in consistency to brownie batter.)

Add cinnamon and chopped nuts to the 1 cup of reserved crumbs, and sprinkle over the top of the batter.

Bake at 350 degrees for 30 minutes

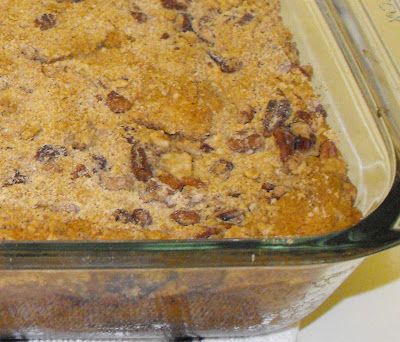
The only thing I might do differently is add just a smidge more nuts--I admit I'm a bit of pecan nut--I love the taste of the pecans on top after they've been toasted, ummmm.

This cake is light in texture, and has a unique, not overly sweet taste--perfect with a cup of coffee or hot tea--or a cold glass of milk. It's definitely a keeper.

To find more links to good recipes see:

The Pantry Party at the Thrifty Countrywoman (look for additional recipes and links in the comments)

Recipe Party at Rhoda's Southern Hospitality

Foodie Friday at Designs by Gollum

Mouthwatering Mondays at A Southern Fairy Tale

Tempt My Tummy Tuesday at Blessed with Grace

Tasty Tuesday at Balancing Beauty and Bedlam

Until next time, good cooking, and good eating!

Friday, October 16, 2009

Pea Patties--the Original "Veggie Burgers"?

While I was home in Louisiana my mom and I were talking about the way people used to cook and eat "back in the olden days"(!) in the south, and especially in the rural south. It wasn't uncommon to have meat only on Sundays or special occasions; there was no running to town to the store for a missing ingredient or impulse item; you ate what you had on hand, and you never, ever wasted food of any sort. As a result, though, our mothers and grandmothers learned to improvise and substitute and come up with all kinds of delicious uses for what they had on hand.

My mom was talking about the way her mother used to make pea patties out of leftover cooked peas--not green peas (or "circle peas" as one of the grandbabies used to say) but real peas--purple hull peas--you could probably use field peas or black eyes or maybe even crowders, but in my family, "peas" means purple hull peas. After a couple of conversations about pea patties and other old time southern delicacies, we decided to make some.

What follows is not exactly a recipe, it's more a fly-by-the-seat-of-your-pants tutorial on making pea patties.

The star of this show has to be, of course, the black iron skillet--put enough "frying grease" to cover the bottom of the pan about 1/4 inch deep. Ideally you should use leftover shortening or oil that's been used and saved, but we can't all be that thrifty--you can use cooking oil if you have to. Turn on medium high heat so that the pan will be hot when you're ready to go.

Mom spooned a couple of cups of cold leftover peas into a bowl, and mashed them up lightly with her big spoon. To that, she added an egg and about half a cup of flour to bind everything together.

She diced up about half of small onion...


...and several tablespoons of green bell pepper and stirred it all together.


Take about a spoonful (maybe 1/4 c or slightly less) and dredge in some flour...


The "batter" if you want to call it that is quite soft (if it's too soft, add more flour or mashed peas), so you'll probably have to do this part with your hands. Form into a small patty shape...


...and drop carefully into your hot skillet


Cook a couple of minutes on one side, until the bottom is browned, then turn carefully...


At this point, my mom lightly mashed the patties--it doesn't take long to brown both sides, and you don't want the patties to be so thick that the inside doesn't get cooked, as well. (If the outside browns too quickly and inside isn't done, your grease is too hot and/or your patties too thick) When the second side was browned, I think we flipped them once more just to be sure both sides were browned and they were hot through and through.

Drain on some paper towels, and enjoy!

At this point I had to put the camera down--it works better if one person does the messy part while someone else tends to the frying pan!

We started off making just a few of these, but once we tasted them, we had to make more--they were delicious! We ate them by themselves as a snack/appetizer, but I can definitely see using these as a meat substitute or a side dish with dinner.

Right now while our son is away at college, I cook for a two-person household most of the time. I love my peas from my parent's garden (via the freezer), but it is easy when there are only two of you to get tired of eating the same vegetable 3 days in a row--and now I have an alternative that's frugal and Delicious!

This post is linked to:

Foodie Friday
with Designs by Gollum

Frugal Friday
at Life as Mom

Recipe Swap at The Grocery Cart Challenge

Until next time--good cooking, and good eating!

Tuesday, October 6, 2009

Easy Bake Lasagna


I live in the south, so we aren't having true fall weather yet, but it's at least cooled off enough that most days I don't mind using my oven. One of my very favorite oven meals to make is lasagna, and what I like about my very favorite lasagna recipe is that it's easy to put together, and you don't have to pre-boil the noodles. Now I know that these days they make no-boil lasagna noodles, but "back in the day" when I first started making this they didn't have those, or at least not in my small town grocery stores. Since that time, I've made lasagna with the no-boil noodles, but I don't particularly care for the texture of the finished product, plus they cost more. With this recipe, you can have the convenience of no-boil noodles with the texture and price of the regular old noodles.

Ingredients:
  • 1 to 1 1/2 lbs ground meat
  • Jar of spaghetti sauce (or the equivalent in home made sauce)
  • 1 envelope of spaghetti seasoning
  • 1 1/2 c water
  • 8 ozs grated mozzarella or Italian blend cheese
  • 16 oz container ricotta cheese
  • 1/2 c grated Parmesan cheese
  • 2 eggs
  • 1 T dried parsley
  • pepper


For the sauce, cook and drain the ground meat--I've used beef, turkey, or a mixture of the two,. Add the jar of sauce (I use Ragu traditional) and the envelope of spaghetti seasoning. (that's my own touch--I think it adds a boost of flavor to jar sauce, especially for lasagna). Pour the water into the jar and swish it around, then add it to the sauce. (The extra water is what makes it possible to use non-pre-cooked noodles.) Bring everything to a simmer.

Meanwhile, combine all three cheeses, parsley, and little bit of pepper, and mix in the two eggs.


Yes, it looks like library paste with green sprinkles in it, but it tastes good!


To start to build your lasagna, start with a 9 x 13 inch pan, sprayed with cooking spray. Pour about 1/2 cup of sauce in the bottom, and spread it around to cover the bottom of the pan

Lay three uncooked lasagna noodles on top of the sauce (they will expand to fill the pan when they cook)


Divide your cheese mixture in half, and put on top of the lasagna noodles (the original recipe stated to 'spread' the mixture-I just kind of glob it on as evenly as I can. Then when I add the next layer of noodles, I press down on the noodles to kind of squish the cheese mixture so that it spreads out even more)


Add about a cup of sauce on top of the cheese.

Repeat with layers of noodles, cheese, and sauce. Add one more layer of noodles, then pour all of the remaining sauce on top.
Cover with foil, and bake at 350 degrees for 50 minutes. Remove the foil and bake for additional 10 minutes uncovered. Allow to stand about 5 minutes before cutting.


I've made this for years, it's usually one of the things my son requests when I haven't seen him in a while (he's away at college). I made this twice recently, and of course trying to get pictures, for some reason could not get a really decent picture of the finished product. It's really delicious, and is another of those "fix it and forget it" meals you can get ready, put in the oven, then go put your feet up and relax while it's cooking.

I usually serve this with garlic bread, breadsticks, or yeast rolls, and of course a salad is always nice with it as well.

This post is linked to:

Tasty Tuesday
at Balancing Bedlam and Beauty

Tempt My Tummy Tuesday
at Blessed With Grace

Tuesdays at the Table
at All the Small Stuff

Recipe Swap
at the Grocery Cart Challenge


Until next time, good cooking, and good eating!