Thursday, December 30, 2010

Back to the Basics--Taco Soup

I don't know about you, but I'm getting just a tiny bit tired of holiday food! I love it all, don't get me wrong, but I wanted something hot and delicious and best of all, my famous words--"quick" and "easy" all rolled into one, so I made a little pot of taco soup for lunch today.

Today's version had:

  • Just over a pound of ground meat, cooked and drained
  • 1 can corn
  • 1 can pinto beans
  • 3 small cans of tomato sauce
  • 1 1/2 pkt taco seasoning

Cook the ground meat loose until browned, and drain. Mix all the other ingredients in the pot, then add the meat back. Bring to a bubble, then simmer for about 20 minutes. Top each bowl with a couple of tablespoons of grated cheese--today I used a combination of mozzarella and cheddar. Serve with cracker or corn chips, or both!

We really enjoyed having something warm and satisfying, and "real" on a cold, wet day!

This recipe is easily doubled, and can be made with almost any kind of beans--I've used everything from red beans to pintos to plain old pork and beans. You can also substitute any kind of tomato product--paste, crushed--I even used tomato soup once in a pinch, then added a can of cheddar cheese soup while I was at it. In other words--this is a recipe that's so basic, but is flexible to accommodate both your family's tastes and what you have on hand.

This post is linked to:

Ultimate Recipe Swap at Life as Mom

Let's Do Lunch, Breakfast, and Brunch at My Sweet and Savory

Recipe Swap at Prairie Story

Tasty Traditions at Coupon Cookin'

Frugal Food Thursday at Frugal Follies

Foodie Friday at Designs by Gollum

Beat the Winter Blues Comfort Food at Goodby City, Hello Suburbs

Until next time, good cooking, and good eating!

Wednesday, December 22, 2010

Gifts From the Kitchen--Microwave Fudge, Part 2

Earlier today I shared a recipe for easy microwave fudge; dark and rich, it's made from easily available items that most of us stock in our holiday pantry. This recipe is just as quick and easy, made from even more readily available ingredients, but it's a whole different taste and texture--more like the old fashioned cooked sugar fudge of my childhood--and has to be my absolute favorite holiday indulgence.


Ingredients:
  • 1 box confectioners sugar (approximately 3 1/2 cups)
  • 1/2 c unsweetened cocoa
  • 1/4 t salt
  • 1/4 c milk
  • 1/2 c (1 stick) butter
Put everything in a microwave safe bowl. Don't stir or mix or do anything to it.

Microwave for two minutes, then get it out and start stirring. You'll think it isn't going to work, but just keep stirring. At one point, everything was blended except for a few stubborn lumps of sugar, so I stuck it back in for another minute, then stirred again. A lot. At this point you can add nuts if you'd like. I decided to leave this batch plain.

Pour into a prepared (greased) pan--or better yet, line with foil and spray with cooking spray. Let cool--I stuck mine in the fridge and just left it for a couple of hours.


Turn out onto a cutting board, peel back the foil, and cut.

This is the best fudge I've made I've ever made. It's not smooth and creamy, it's firmer, sort of dry-ish and crumbly, just like the old fashioned sugar fudge of my cravings.

This post is linked to:
Foodie Friday at Designs by Gollum
Food Friday at MomTrends

Until next time, good cooking, and good eating!

Gifts From the Kitchen--Easy Microwave Fudge, Part One

Number three in my installment of gifts from the kitchen is a variation of an old stand-by--rich chocolate-y fudge.

This particular recipe is by far one of the easiest recipes for quick fudge that I've ever run across. The basic fudge has only three ingredients, but it lends itself to any number of variations.


Ingredients:
  • 1 12 oz pkg chocolate chips
  • 1 can sweetened , condensed milk
  • 1 t vanilla
Grease a 9 x 9 pan--I lined my with foil and sprayed with cooking spray--you could probably use parchment paper, as well.

Combine chocolate chips and sweetened condensed milk in a microwave safe bowl.


Microwave 2-3 minutes, stirring after every minute, or until chocolate is melted and the milk is incorporated (this picture is after 1 minute) I stirred again at 2 minutes and cooked it an additional 30 seconds just for good measure. Add vanilla and stir well. At this point, I decided on an add-in and stirred in about 1/3 cup of chopped pecans. (Next time I'd probably go with 1/2 cup).

Pour into your prepared pan and chill for about two hours.


Turn out onto a cutting board, peel back the foil if you used it, and it's ready to cut.
This made a thin, dark, rich tasting fudge. I used semi-sweet chocolate chips, but I think it would be good with milk-chocolate chips, and probably the peanut butter or butterscotch flavored chips as well. I think it would also lend itself to doing a layered fudge with two different flavors of chips.

I packed some of it in this cute little mini-lunch box tin that I bought in the seasonal decorations at Dollar Tree.
Besides the ease of this recipe, I liked the fact that the ingredients are items you can keep on hand for anytime, not just during the holidays. Chocolate chips and sweetened condensed milk may not be something you keep on hand in a really basic pantry, but I think most of us have them on hand or readily available, at least.
Why not stock up while they're on sale everywhere and surprise your family with this luscious bite of rich chocolate later in the winter, when they aren't expecting it? Maybe you can make your own goodies for Valentine's Day, too, instead of buying "store-bought" candy.
Tomorrow I'll have another easy microwave fudge, but one that makes one that's totally different in taste and texture.
Until next time, good cooking, and good eating!

Tuesday, December 21, 2010

Gifts from the Kitchen--Quick and Easy Coconut Macaroons

For my second installment in the Gifts from the Kitchen series, I chose a cookie that's unusual for me, especially in a homemade version.

Ya'll know that "quick and easy" is my middle name when it comes to recipes--this recipe is no exception, but I am so impressed with myself for making these--I had no idea that coconut macaroons were so easy to make, and oh, my, are they wonderful. These are not those horrible hard ridged squares that passed for coconut macaroons in my childhood. Chewy in the middle, crunchy around the edges, they're like taking a bite of sweet goodness that I can't even describe.

Ingredients:

  • 1 14 oz pkg sweetened flake coconut
  • 2/3 c sugar
  • 6 T flour
  • 1/4 t salt
  • 4 egg whites
  • 1 t almond extract (I used vanilla)

The recipe I used stated to mix everything together in a bowl--it works better to get all of the ingredients evenly distribued and incorporated if you mix the last five ingredients first, then add in the coconut.


Placing heaping spoonfuls on your prepared cookie sheets. The hardest part was trying the mounds all close to the same size. (This will be easier if you have a cookie scoop.)

Bake at 325 degrees for 17-20 minutes.


This is not really a batter, it has the texture of a wet pile of coconut--but it smells wonderful. And tastes pretty good, even uncooked. Warning--it's extremely sticky, even after you lick your fingers. Don't ask me how I know this.


At this point, they smell so very heavenly. Remove from the baking sheet to a rack to cool.

The first time I made these, I followed the original recipe recommendation to grease and flour the cookie sheets. Can you see how the flour on the baking sheet starts to brown? When you take the cookies off, the spatula leaves big strokes of messed up flour. So you have to wash the cookie sheet before you can re-use it, but instead of greasing and flouring it again...


...come to your senses and use parchment paper instead.


This recipe makes about 4 dozen cookies.

I think they make a good addition to any goodie bags or boxes you're making up this holiday season. They're just enough different from the usual cookies and candy that we all make to be a welcome change!

What goodies are you baking this holiday season?

This post is linked to:

Tempt My Tummy Tuesday at Blessed with Grace
Recipe Swap at Prairie Story
Until next time, good cooking, and good eating!

Sunday, December 19, 2010

Gifts From the Kitchen--Jar Mixes

The clock is ticking and the days are flying by on the calendar, but there's still time to make last minute gifts from your kitchen--made with common ingredients and with a minimum of fuss and muss.

First in my last-minute series of last-minute gifts and goodies from the kitchen, are these pretty layered mixes in a jar.

Right now everyone is getting inundated with goodies at every party and get-together--these ready-made mixes make a pretty gift, and will be appreciated one cold winter night when those New Years diet resolutions have worn off and the ready-made goodies they got at Christmas or Hanukkah are a dim memory.

All you need are the recipe ingredients and some quart jars with lids--wide mouth work better, but as you'll see, the smaller mouthed ones can work, as well. I got two of my recipes from Heart 4 Home's Gifts in a Jar, and used my own brownie recipe for the other. You can do this with just about any recipe, as long as the total volume doesn't exceed the size of your jar--in this case, a quart.


I gathered everything together this weekend for some major baking and "mixing" I had planned, and spread it all out with arm's length. Luckily I had a canning funnel to help fill the jars, but if you don't have one of these handy, you might want to make a loose funnel out of waxed paper for easy of filling with less spilling.


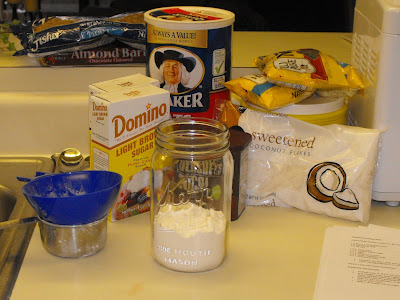
I started off planning to take pictures at each stage, but soon learned and handling "powdery" ingredients like flour and cocoa, and taking pictures don't really mix, so this is the only "during" picture that I ended up with.

The main thing to remember is that the ingredients need to be added with the finer textured ingredients at the bottom, the chunkier stuff at the top--if you start with chocolate chips and then pour flour over the top, for instance, the flour will sift down in between the chunks and mess your layers up.

Step number two is to try to smooth each layer and pack it as tightly as you can. I used a spice bottle for that--guess what, you can't tamp down flour or cocoa very well, the bottle sinks(!) Recipes with oatmeal pack well--add the flour, then the oatmeal, then tamp it down to your heart's content!

Next add the sugars, and last the chunky stuff.


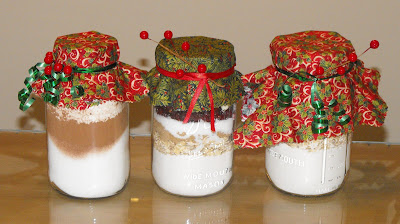
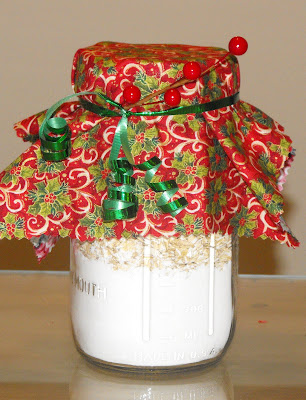
Don't these look pretty? These are for Homemade Brownies, Cranberry Hootycreeks, and Cowboy Cookies.

I added circles of Christmas fabric cut with pinking shears, tied with ribbon and garnished with a berry spray. My last step will be printing out the recipe directions (add butter, eggs, bake at 350, etc ) on some card stock, cutting with the pinking shears, and tying to the jars with the ribbon.

Change the fabric, or leave it off and tie the recipe card on with some raffia or other decorative ribbon, pair a couple of them with a kitchen gadget or two and a pretty dishtowel, and you have a perfect gift for a kitchen shower or housewarming party.


Cranberry Hootycreeks
  • 1 c plus 2 T self-rising flour
  • 1/2 c oatmeal
  • 1/3 c packed brown sugar
  • 1/3 c sugar
  • 1/2 c dried cranberries
  • 1/2 c white chocolate chips
  • 1/2 c chopped pecans

Layer in the order listed. Recipe instructions:

  • In a medium mixing bowl beat together 1/2 c softened butter, 1 egg and t teaspoon of vanilla. Add the entire contents of the jar, and mix together until well blended. Drop by heaping spoonfuls onto greased or parchment paper lined baking sheets.
  • Bake for 8 to 10 minutes at 350 degrees or until the edges start to brown
  • Cool on baking sheet or wire rack
  • Makes 18 cookies

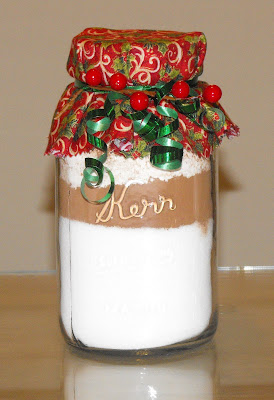
Easy Homemade Brownies

  • 1 c flour
  • 1/2 c cocoa
  • 2 c sugar

Layer ingredients in the order listed ( I messed this up by putting the sugar first--when I tried to tamp the cocoa, it started mixing with the sugar. Oops

Recipe:

  • Pour entire contents of jar into a mixing bowl
  • Add 1 stick (1/2 c) of butter or margarine, melted; stir slightly; then add 4 eggs and 1 t vanilla
  • Pour into greased or cooking sprayed 9 x 13 pan.
  • Bake at 350 for 25-30 minutes
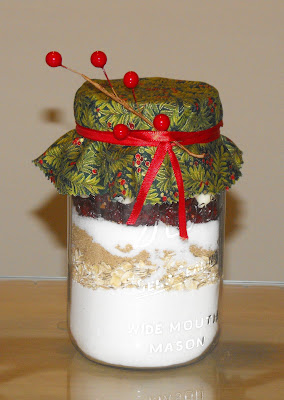
Cowboy Cookies

  • 1 1/3 c self-rising flour
  • 1 1/3 c oatmeal
  • 1/2 c firmly packed brown sugar
  • 1/2 c sugar
  • 1/2 c chopped nuts
  • 1 c chocolate chips

Layer ingredients in order listed--tamp well after the oatmeal layer, and after the brown sugar layer. I made this one first, and did not "pack" everything tight enough, so the first one only held about 1/2 c of chocolate chips. I made another and figured out the best layers to tamp down and everything fit much better.

Recipe:

  • Empty entire contents of jar into a large mixing bowl, and thoroughly blend everything with your hands or a mixing spoon. Add 1 stick (1/2 c) of butter or margarine, melted; 1 slightly beaten egg, and 1 t vanilla. Mix until completely blended. This may require your hands! Shape into balls the size of walnuts, and place on greased or parchment lined cooking sheets.
  • Bake at 350 degrees for 11-13 minutes or until edges are lightly browned.
  • Cool 5 minutes on baking sheet, then remove cookies to racks to finish cooling.
  • Makes about 30 cookies

I had a lot of fun making these--now that I've gotten the hang of it, I may be doing more of these. Be sure to check out the jar mix "recipes" at Heart 4 Home, or do an internet search for "jar mixes", there are tons of different recipes and sites out there with lots of ideas, from sweet to savory.

What pre-made mixes or jar mixes have you made, or would you like to receive?

This post is linked to:

Three or More at the Gypsy's Corner

Just Something I Whipped Up at the Girl Creative

Tuesday Night Supper Club from Fudge Ripple

Until next time, good cooking, and good gifting!

Saturday, December 18, 2010

Eggless Eggnog--Is That Just "Nog", Then?

I've been in a bit of a cooking rut lately, can you tell? No new dishes means no new posts. Even my holiday cooking (and lack thereof!) hasn't helped. It's only a week until the Big Day, and I haven't done the first bit of baking or candy making (what's that all about?) So I think I need to settle down and figure out a plan and a grocery list and hop to it. And just in case you find yourself in a similar predicament, this week I'm going to be sharing some of my favorite goodies that you can make for yourself, or package up for nice last minute gifts. As always, they'll be quick and easy to make with a minimum of fuss and no exotic ingredients.

To start us off right, how about cozying up with a winter holiday classic-with-a-twist, my easy and delicious Eggless Eggnog--or as I like to say, "Just Nog":

Previously Posted:

One of special treats to indulge in at this time of the year is Eggnog.

I've always wanted to learn to make homemade eggnog, but the recipes all seemed so complicated. Separate eggs, cook the custard, beat the whites, fold in, way too many steps for this everyday cook. Not to mention that everything you read warns against using real (raw) eggs, so you have to buy special egg white powder--who does all of that?

So I've become a real connoisseur of good "store-bought" eggnog--and trust me, all brands are not created equally! The problem with good eggnog, though, is that it's 1. expensive, and 2. extraordinarily full of fat and calories.

So imagine my delight when I found this recipe! It's super simple to make, inexpensive, and everything in it is a "regular food" ingredient, nothing exotic!

Ingredients:
  • 1/2 gallon milk
  • 1 pkg instant French vanilla pudding mix
  • 1/4 c sugar
  • 2 t vanilla
  • 1/2 t ground cinnamon
  • 1/2 t ground nutmeg
Whisk together pudding mix and about a cup of milk. When it's all blended and dissolved, add the sugar, vanilla, and spices. Pour into a 2 quart pitcher, add the rest of the 1/2 gallon of milk, and stir well. Refrigerate for a couple of hours or overnight. Stir well before serving--the spices tend to separate and float to the top and bottom.

I've made this several times, and it's delicious--it tastes just like eggnog, except that it doesn't have the "thickness" or body that most eggnog has. (hint--if you miss the thickness, top with whipped topping and stir it in--it will thicken up nicely)


Variations:
Use Splenda and sugar-free pudding mix, and skim milk for a really lo-cal version.

For someone lactose intolerant or with allergies, you could use your substitute milk of choice.

I made this with 2% milk; for a special occasion, try substituting half-and-half or cream for part of the milk.

Top with whipped cream for a real treat!

Until next time, happy (un)cooking, and happy sipping!

Thursday, December 2, 2010

Giveaway Winner--Fresh Express Salad


Thank you to everyone who entered the Fresh Express Salad free coupon giveaway, sponsored by Fresh Express and FoodBuzz. The winners are:

Random Integer Generator

Here are your random numbers:

24 Lisa S
32 Brenda V
35 Ruth W
37 Rachel H
39 Dianne
46 Julie Z
49 James C
54 Kathy S
68 Lisa G
72 Julie L

Timestamp: 2010-12-03 02:07:05 UTC

I'll be notifying the winners via email--congratulations!

Thanks again to everyone who entered, I hope to see you back again soon!

Until next time, good (un)cooking, and good eating!

Friday, November 26, 2010

Fresh Express Salad Coupon Giveaway

(Giveaway is now closed!)

I know I promised another giveaway for last week, but I confess--I just did not take the time to get it all together! So I decided to simplify, simplify, simplify, and run it as it is!

It's been a busy, stressful week in a lot of ways not the least of which was the Thanksgiving holiday, where I ate my fair share of rich, delicious food. And this is only the beginning--Hanukkah, Christmas, and the New Year are upon us, where we have family gatherings and social occasions galore, each with food more delicious than the last. It's a real struggle to not just give in and wind up facing down January with an additional 10-20 pounds and a bad case of indigestion!

One of the things I'm trying to do this extended holiday season is to get back on track with my healthy eating as much as is possible during the everyday, in-between times.

Having a ready made, bagged salad is one thing that can make that easier during this busy time. I love the convenience of having everything already washed and cut and ready to go, and I especially like the variety available--instead of buying several different types of lettuce and vegetables, I can get it all together in one bag if that what's I want! I like to take the Italian blend with all of the darker greens, then add a little grated cheese, some sunflower seeds and dried cranberries, and if I'm eating it as a meal, a little protein on top--diced leftover chicken, or even a can of tuna--and of course my dressing of choice--anything creamy!

Fresh Express and the FoodBuzz program sent me a coupon for a free bag of Fresh Express salad, and not only that, they gave me 10 extra coupons to share! These coupons are good until January 31, 2010, so whether you want to try a Fresh Express salad now during the busy season, or save it for that sure-to-come New Year's resolution to eat more salad, this one will work for you!

To enter, just leave your name and email address in the form below, and tell me your favorite way to use bagged salad--do you you use it straight out of the bag, or as a foundation to build on? This giveaway will run until Thursday, December 2, 2010 at 6:00 p.m., when 10 winners will be chosen at random and notified via email.

The giveaway is now closed, the winners will be announced shortly!


(The opinion stated is that of my own.)

Monday, November 15, 2010

Fall Favorites--Sweet Potato Souffle with Pecan Praline Topping


With Thanksgiving here in ten days, I though I'd share my favorite sweet potato casserole recipe. This is not your typical Thanksgiving-day-yams-with-marshmallow-topping sweet potatoes, this dish has a yummy topping made with brown sugar, pecans, and butter that melts together into a praline flavored crust on top of soft and sweet mashed sweet potato souffle.
Ingredients:
  • 6 c mashed sweet potatoes
  • 2 c sugar
  • 1 c melted butter or margarine
  • 4 eggs
  • 2 t vanilla
If you're using canned sweet potatoes/yams, drain and mash. If using fresh sweet potatoes, bake these ahead of time, then scoop out the insides. Add the sugar & melted butter. Beat eggs separately, and add after the butter has cooled a little. Add vanilla, and beat with mixer until ingredients are well blended. You will probably still have some lumps, unless you run it through a food processor. You can also mix by hand, but the batter will not be as smooth. Pour this into a greased or cooking-sprayed 9 x 13 pan or equivalent casserole dish.
(Note: the pictures below are a half recipe)

In a separate bowl, mix together :
  • 1 c chopped pecans
  • 1/2 c flour
  • 1 c brown sugar
  • 5-6 T melted butter or margarine
Mix together the nuts & flour, then add the brown sugar and stir together. Add the melted butter last, and stir until everything is moistened. Sprinkle the topping evenly over the sweet potatoes.
If I use especially fine chopped pecans, or for special occasions when I want the finished product to look especially pretty, I add extra pecan halves on top.

Bake at 350 for 35-40 minutes, (longer if you make this ahead and refrigerate overnight) or until topping is melted together and browning on the edges.
There's something that happens when I add the pecan halves on top that's more than the sum of the separate ingredients--the nuts take on a completely different taste, with a smoky, roasted flavor, which combines with the brown sugar and butter to a make a candied pecan taste that is out of this world.
My husband loves this so much, he eats it as a side dish with his meal, and then usually gets more for dessert. I think it would make a wonderful pie--I keep telling myself that someday I'll try it that way, but it's so good just as it is that I can't bring myself to change it up!

This recipe is linked to:

Meatless Monday at My Sweet and Savory
This Week's Cravings at From My Tiny Kitchen
Mouthwatering Monday at A Southern Fairytale
Tuesday Night Supper Club at Fudge Ripple
Tuesdays at the Table at All the Small Stuff
Tempt My Tummy Tuesday at Blessed with Grace
Pantry Recipe Swap at Home and Pantry
What's Cooking Wednesday at the King's Court IV
Ultimate Recipe Swap at Life as Mom

Until next time, good cooking, and good eating!

Giveaway Winner--Pillsbury Pie Crusts Package


Thanks to everyone who entered the Pillsbury Pie Crust package giveaway, there were 130 entries! The winner, as always, is chosen by random number generator.

Random Integer Generator

Here are your random numbers:

71

Timestamp: 2010-11-16 01:01:06 UTC

And #71 on my spreadsheet is:

Tonya D! Tonya stated that she would like to use the pie crusts and other items to make a caramel apple pie. That sounds like my kind of pie!

Thanks again to everyone who entered! Be sure to check back later in the week, I have another giveaway schedule, this is a simple one, but will have multiple winners!

Until next time, good cooking, and good eating!

Thursday, November 11, 2010

Fall Favorites--Pumpkin Pie Cake

It's finally beginning to actually feel like fall here in the deep south. We had frost on the ground this past weekend, and while I haven't broken out the flannel sheets yet, I did at least have some hope that we might end up with some cozying up weather before much longer.

I don't know about you, but thinking about fall and of course the Thanksgiving holidays that are just around the corner, gets me in the mood for cooking and baking. The air conditioner may still be running during the daytime, but these long dark evenings make me want to wrap myself around a nice hot bowl of soup and a spicy dessert--preferably one with some vanilla ice cream or whipped topping on top!

And so in honor of fall and the (somewhat) cooler weather, I'm going to re-post some of my seasonal recipes, with maybe a new one slipped in there here or there.

Today's recipe is a favorite, one that I made for the first time last year. It's quick and easy to make, as always, and tastes (and smells!) like the perfect fall dessert.


Ingredients:
  • 1 29oz can of pumpkin (or two 15 oz cans)
  • 1 12oz can evaporated milk
  • 3 large eggs
  • 1 c sugar
  • 4 t pumpkin pie spice
  • 1/2 t salt
  • 1 yellow cake mix
  • 1 c chopped nuts (I used pecans, you could use walnuts, too)
  • 2 sticks of butter, melted

In a large bowl, mix together pumpkin, evaporated milk, sugar, eggs, pumpkin pie spice and salt. Pour into a greased or Pam-sprayed 9 x 13 pan.


Sprinkle the entire box of cake mix on top

Cover with chopped nuts

(I think I used more than 1 cup--I just eyeballed it until I thought it looked right--I like lots of nuts)

Drizzle with 1 cup (2 sticks) melted butter

Bake at 350 degrees for 60-75 minutes, or until a knife inserted in the center comes out clean. I baked this for 60 minutes, then covered it with foil and baked for another 6 or 7 minutes, then turned off the oven and left it for another 5-7 minutes or so. I think I should have covered it with foil a little sooner, but that's due to a peculiarity of my oven.

If you serve this hot, it's a "scoop" dessert. Once cold, you can either scoop a portion or cut it into squares. This would be excellent with a scoop of vanilla ice cream, or even a dollop of whipped cream, but it's delicious just by itself.

I'm linking this post to:
Tuesday Garden Party at An Oregon Cottage
Recipe Swap Thursday at Prairie Story
Tasty Traditions at Coupon Cookin'
Ultimate Recipe Swap at Life as Mom
Recipe Swap at the Grocery Cart Challenge
Friday Food at MomTrends
Meatless Monday at My Sweet and Savory
What's Cooking Wednesday at the King's Court IV
Ultimate Recipe Swap at Life as Mom

Until next time, good cooking, and good eating!

Tuesday, November 9, 2010

Pillsbury Pie Crusts--Review, Recipes, and Giveaway

(This giveaway is now closed, thanks for entering!)


MyBlogSpark and Pillsbury have done it again with what I think is the best goodie box yet!


As part of a review/giveaway opportunity, I received a coupon for a free package of Pillsbury Pie Crusts, as well as all of the cute kitchen things pictured above--a glass pie plate, pot holder, cutting board, apple slicer, nested measuring cups, and apple-shaped kitchen timer.


Pillsbury refrigerated pie crusts have to be one of the greatest commercial kitchen achievements since sliced bread! I grew up in a household where we made cakes and bought pies, and if it weren't for pre-made crusts I probably would have made very few pies in my lifetime! I've made exactly one "from scratch" pie crust in my adult life, and while it tasted fine, it definitely wasn't pretty! I love, love, love the ease and convenience of these crusts, and they taste, in my opinion, better than most frozen pie shells I've eaten.


Let me just show you some of the ways I've used Pillsbury refrigerated pie crusts:
(click on the links to go the recipe posts)


During Purim in the spring, I've cut out circles of pie crust and made these little apple tarts known as Hamantaschen....

During berry season in the summertime I've used one as a bottom crust and cut the other into strips to make this Lattice Top Blackberry Pie...

...or pre-cooked the crust and filled it for this Chilled Blackberry Pie...

And last but certainly not least, made this beautiful full-of-spice-and-smells-of-fall custard style Navy Bean Pie.

This giveaway is now closed, thanks for your interest!

And now for the giveaway---thanks to Pillsbury and MyBlogSpark, one reader will recieve a package identical to the one I recieved. To enter, just leave your information on the giveaway form, and let me know what kind of pie you'd make with your Pillsbury Pie Crusts. The form will stay active until next Monday night, November 15, 2010 at 6:00 p.m. Central Time, and the winner will be chosen at random and notified via email.

Good luck!

Until next time, good cooking, and good eating!

(The opinion stated is that of my own.)

Monday, November 8, 2010

Giveaway Winner--Pillsbury frozen Mini Grands Biscuits


Out of 173 entries, the winner of the Pillsbury frozen Mini Grands Biscuits prize package is:


Random Integer Generator
Here are your random numbers:

45

Timestamp: 2010-11-08 19:20:30 UTC

#45--Marcia G. ! Marcia, I'll be sending you an email to get your shipping/mailing address.

Thank you so much to everyone who entered--I got a lot of nice feedback and recipe ideas from the entry comments, I'm looking forward to doing some other posts with these handy-dandy frozen biscuits.

Be sure to come back later this week, I have another review and giveaway that should be ready by tomorrow, and it's the best prize package yet!

Until next time, good cooking, and good eating...

Sunday, November 7, 2010

Sugar Free Sunday--Cinnamon Pull Apart Bread

Earlier this week I made a yummy personal-pan-sized cinnamon pull-apart bread as part of a review of Pillsbury frozen Mini Grands biscuits, but it was so good, it deserves a post of it's own.

Ingredients:
  • 2 T butter, melted
  • 2 T sugar
  • 1 t cinnamon
  • pecans
  • 6 frozen Pillsbury Mini Grands biscuits

Spray an oven-proof with cooking spray, then throw in a few pecans. Dip the biscuits first in melted butter, then roll in cinnamon-sugar mixture and place in bowl. Add a few more nuts, and pour the leftover butter and cinnamon mixture over the top. Bake at 350 degrees for 20-30 minutes, or until the biscuits are firm to the touch. (you won't be able to tell from browning because of the cinnamon.) Invert onto a plate.

This was so very delicious, I have to admit, I ate the whole thing myself, although not at one sitting (it was two sittings).

Then this weekend, since I had about a dozen of the cute little mini-biscuits left, I decided to try a sugar-free version, as well.


Ingredients:

  • 4 T butter, melted
  • 4 T Splenda (or sugar if you don't need/want sugar-free)
  • 2 t cinnamon
  • 12 Pillsbury frozen Mini Grands biscuits
  • chopped pecans (I didn't measure)

Just as in the regular version of this I made earlier this, I melted the butter in a small bowl, and mixed the Splenda and cinnamon in another. After spraying a load pan with cooking spray, I sprinkled in a handful of nuts. Dip the frozen mini biscuits first in melted butter, then roll in Splenda-cinnamon mixture, then place in the loaf pan. The leftover cinnamon mixture and melted butter I poured over the top, then added anther handful of chopped nuts. Bake at 350 for about 25 minutes, or until the biscuits are firm to the touch. Invert onto a serving plate.

This was pretty good, but I have to admit--the one I made using sugar was better. The sugar-free version was good if you haven't had sugar in a while, but I've been pretty hit-or-miss with my sugar intake lately, so having both in the same week may have disturbed my taste buds just a wee little bit. I thought the sugar-free version was a little drier, and not as sweet tasting. Splenda dissolves much quicker and more thoroughly in liquid than sugar does--so it works well in many things, like the ice-box pickles I made this year. And in baking, you definitely need to follow the package directions and add additional powdered milk and baking powder to make up for the bulk and other that sugar adds. But it also doesn't melt the same as sugar, either, hence the drier result, and it doesn't candy-fy. Yes, yes, I know that this is not a technical term, but I don't know what else to call it. So I think this particular recipe, the sugar-free version at least, would be better with some additional moisture. Not butter--but maybe a little evaporated milk? Hmmm. I'll have to think about that. Any suggestions?


Meanwhile, I'd love to have you link any sugar free recipes or product reviews that you may have.


Until next time, good cooking, and good eating!

This post is linked to:
Recipe Swap Sunday at Remodelaholic
Just Something I Whipped Up at the Girl Creative
Meatless Monday at My Sweet and Savory
Slightly Indulgent Tuesday at Simply Sugar & Gluten Free
Tuesday Night Supper Club at Fudge Ripple
Tuesdays at the Table at All the Small Stuff
This Week's Cravings From My Tiny Kitchen