Wednesday, July 29, 2009

And I Thought MY Kitchen Needed Help--A Look Back In Time

I posted earlier this week on my other blog a little bit about our trip Saturday to the Chief Vann House. One of the interesting points about this house is the lack of any kind of kitchen in the main house. Everything was cooked either outside or in the freestanding kitchen building, then brought inside to be served.

This is the kitchen building on the Chief Vann House site, circa 1804--obviously they have redone the foundation and some of the brickwork to make it safe for modern occupation--even just for touring.

(as always, click on any of the pictures to see them in close up detail-then just hit the "back" arrow to come back here)

Look at the size of those timbers!

Can you see the wood shingles?

Not even a cook stove in the early days--this is one of two fireplaces--note the "insert" in the chimney--I assume for baking or keeping things warm.


Somehow the bricked area behind the mannequin must have vented into the chimney--there is a smaller fire box and some grating on top for cook pots--an early 'built in" stove top!


Slightly wider shot

Convenient for the young one whose job it was to keep the fires banked at night and to stir them back up in the mornings, as well as to keep the wood box filled and haul water and supplies as needed.
Did you notice the rope strung back and forth on the bed frame? That gives an added springiness to the "mattress"--a homemade sack filled with straw or corn shucks.


"Fine dining" for the family who staffed the kitchen
(yes, that's a water bottle--there were some nice ladies there demonstrating butter churning, and one of them left her bottle on the table)

Drinking gourd, hanging handily behind the door

I somehow failed the get pictures of the rest of the "front room"--the ladies were passing out home churned butter and crackers, I think I got distracted by my chewing (!) and unfortunately, the pictures from upstairs turned out blurry.

Linking this to Vintage Thingie Thursday at Coloradolady

See pictures of the dining room in the main house for Tablescape Thursday on my other blog, A Virtuous Woman.

Until next time....

Thursday, July 16, 2009

Stovetop Barbecue Chicken


I love barbecued chicken when it's done well--yummy and spicy sweet on the outside, moist and delicious on the inside. We have a grill at home in Louisiana, but at the corporate apartment we live in while we're "on the road" in Georgia, we aren't allowed to have a grill on our balcony or porch. (They're screened in, so no mosquitoes, but that means no grill, either!)

My grandmother used to make the best oven barbecue chicken--it would fall off the bone it was so tender, and made the best sort of gravy that was delicious over rice. It's been so hot this summer, though, I've tried not to use the oven more than I just have to. So, I experimented a little and came up with this stove-top version.


I started off, as usual, with IQF (individually quick frozen) boneless skinless thighs. I think this would work with almost any kind of chicken, including bone-in pieces. I put these in my pan, sprinkled with an all-purpose seasoning blend ( I use Tony Cachere's) and some dried onion flakes.

Cover with water and bring to a good rolling boil, then cover and reduce heat to medium or medium high. Turn the pieces after a few minutes so that they cook evenly.


Uncover and let this continue to cook on a low bubble-more than a simmer, but less than a boil (!), until the chicken is cooked through and some of the water has cooked away.


Leaving the reduced water in the pan, I added a couple of splashes of Worcestershire Sauce, 2-3 Tablespoons of Country Bob's All-purpose sauce, and some barbecue sauce (I used Kraft Thick and Spicy Original), about 1/2 cup. I'm guessing, here, it would vary according to how much chicken you're cooking. If you think you have too much water left, you could always pour some of it off, but you need some water to blend the sauces and allow everything to cook together without scorching. The juices already there from the chicken cooking make it that much better. Bring this sauce to a low bubble, then cover and let everything just simmer together for a while, stirring occasionally.


About 10 minutes before you're ready to serve this, take the lid off and let it simmer uncovered, to thicken and reduce the sauce. By this point, the chicken should be literally falling apart. If you used bone-in pieces, you can probably fish around and pull out the bones.

My family loves this served with rice (see my post on making rice in the microwave), but I think it would make a good bbq sandwich on a bun, or even served over corn or Dorito-style chips with a little bit of cheese sprinkled on top.

I've made this several times with chicken, I'd love to try it with a good piece of boneless steak or a chuck roast.

What hot-weather reinvented dishes have you come up with?
This recipe is being linked to:

Foodie Friday at Designs by Gollum
Tasty Tuesday at Balancing Beauty and Bedlam
Tempt My Tummy Tuesday at Blessed With Grace
Check out the links for more recipes.


Until next time, good cooking, and good eating!

How to Cook Rice in the Microwave


I was born and raised in Louisiana, and my family has always eaten a lot of rice. Not just in traditional Cajun and creole dishes, but every day white rice served with every day food. We ate it covered with chili or beef stew, covered in gravy, or plain with butter on it. Not every single day, but it was a definite staple in our kitchen and on our table.

When I had my own kitchen, I continued that tradition. The first meal I made for my not-yet husband had a side dish of rice--which he promptly ate with butter and sugar on it instead of gravy! Since then he's learned to eat rice the right way (!) So, as you can see, rice has been a part of my kitchen repertoire literally for years.

Since we're been in Georgia, we've been living in a furnished, "corporate" apartment, without a lot of extra pots and pans. It seemed as though every time I wanted to make rice to go with a meal, the saucepan I needed was in use already. I decided to try cooking it in the microwave, and it turned out so well and is so easy to do that I cook it that way most of the time these days, whether I have a pot available or not!


The proportions are basically the same--one part rice to two parts water. You need an oversized bowl with a lid, or some cling wrap to cover it with.

Measure 1 cup rice and 2 cups water into your bowl, and microwave uncovered for 10 minutes on high. At the end of 10 minutes, cover and microwave an additional 3 minutes, still on high.

At this point, taste just a bite--every now and then I add an additional 1/4 cup of water and microwave for an another minute if it doesn't seem quite done the first time.


And now it's ready--for gravy or butter or whatever you choose to serve with it.

Note:
You can use part or all broth or stock, or add a teaspoon or two of bullion or stock paste. I like to use chicken broth sometimes, according to what we're going be eating it with.

I hope this makes your life a little easier, I know it has made mine!

Until next time, good cooking, and good eating!

Tuesday, July 14, 2009

Oatmeal, the Non-Instant Almost Instant Version


I grew up eating instant oatmeal--I mentioned in an earlier post that my mother was never much of a biscuit maker. Truth be told, she wasn't much of a breakfast person. We ate lots of toast, cold cereal, pop-tarts, "canned biscuits" and instant oatmeal growing up. My husband has always loved oatmeal, but with him it has to be "real" oatmeal, not instant.

From time to time on weekends we have oatmeal and toast--since our son doesn't eat oatmeal and never has, it's a just-the-two-of us breakfast, usually cooked by hubs, made the regular, old-fashioned way on top of the stove.

Somehow, somewhere I found that I like regular, non-instant oatmeal with raisins--they have to be cooked in the oatmeal, not just added afterwards, but I seldom had it like that because hubs doesn't like raisins in his oatmeal. It seems like too much trouble to dirty up a pot and make oatmeal with raisins for just one person...

until.....

I read about cooking it in the microwave.

Hello....there are microwave directions right on the box! Why have I never thought about this?

Maybe because it smacked of instant?

I don't know the answer to that question, but since I realized I could do this, I've had oatmeal-for-one (with raisins!) for breakfasts, lunches, even late-night snacks. It's so simple, I can't believe I haven't been doing this for years.


This is what you need:
  • 1/2 c Oatmeal
  • 1 c water or milk or both
  • Butter, raisins, white or brown sugar or honey or whatever you want to add

Measure 1/2 cup of oatmeal into an oversized (important!) bowl, add 1 c of water or milk or any combination of the two--I usually do a half cup of each.


Microwave for two minutes. Add 1-2 tablespoons of raisins, and microwave another minute. For this last minute, especially, WATCH CLOSELY, and pause the microwave if it foams up. Once it subsides, resume cooking. Use a potholder or dishcloth to remove from the microwave, it will be hot.


Add your butter or cream, and whatever sweetener you choose. I like brown sugar with a sprinkle of cinnamon some days, other days just plain old white sugar. Of course you could add Splenda or another sweetener if you choose.
And now--I'll think I'll make myself some oatmeal for supper. With raisins.
Until next time, good cooking, and good eating!


Thursday, July 9, 2009

Baked Chicken and Rice

I'm bumping this post up in order to participate in the Ultimate Recipe Swap (Chicken edition!) at Life as Mom, and Tasty Tuesday at Balancing Beauty and Bedlam

Originally posted March 2, 2009:


I've been at home in Louisiana for the last ten days or so. I have two homes--my house in Louisiana, and a furnished, corporate apartment, currently in Georgia. When I'm home, as in HOME home, in Louisiana, I tend to not cook as much because life has a sort of temporary, almost "vacation"-like quality. One dish that I do tend to make a lot at home, though, is baked chicken and rice. I developed this version when I was working full time, involved in ministry, taking care of family, trying to figure out main dishes that I could just throw together and let it cook at the end of a busy day. I hate to admit how often I used to make this, just because it's so easy! But as a result, it's one of my son's favorite meals that speaks of home.

I make this in a large covered casserole dish or dutch oven--my favorite is a 4 1/2 quart Corning Ware baking dish with a clear glass lid.

Ingredients:

  • 1 c uncooked long-grain rice
  • frozen boneless skinless chicken thighs
  • 1-2 t chicken stock base or bouillon
  • dried onion flakes

Mix together 1 cup uncooked rice, 1 cup of water, and 1-2 t chicken stock base or bouillon, dried onions and little pepper directly in your cooking-sprayed or lightly greased casserole dish. I use IQF (individually quick frozen) boneless skinless chicken thighs in this, which I buy by the bag from Sam's Club--it has all of the convenience of boneless, skinless breasts, but is less expensive, more moist, and I think tastes better. Lay unthawed chicken on top, sprinkle with seasoning mix (I use Tony Chachere's); cover, and bake a 350 degrees for at least an hour. I usually cook it a little longer, because we like the rice to get browned and "crusty" right around the edge.

Steam some veggies in the microwave, add a pan of quick rolls to the oven, and you have an easy meal that still means "home cooking" to your family.

Notes:

If you use frozen boneless, skinless breasts, add 1/2 c extra water or broth--they tend to be dryer than the thighs

You can substitute broth or stock if you have it, for the water and chicken stock base--I love the Tone's chicken stock base, also from Sam's Club--it's a paste, not a powder, and has the best flavor of any I've tried. I've also used onion soup mix instead of stock base and dried onions--it's a different taste than using the chicken stock base, but just as good.

I love this recipe for the "fix it and forget it" quality--I can come in from a long day, throw this together, get it in the oven, and still have some time to put my feet up and catch on world events while it cooks. If I get sidetracked and it cooks a little long, the rice may get a little brown around the edges, but the cover keeps it from drying out completely--perfect for those times I get carried away catching up on blogs or emails!

Until next time, good cooking, and good eating!

Thursday, July 2, 2009

Buttermilk Biscuits the Easy Way

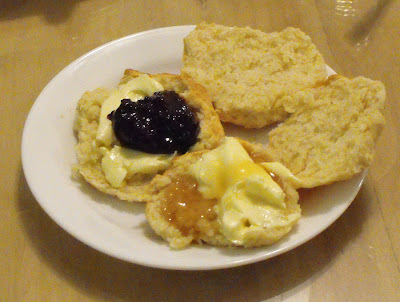
Buttermilk biscuits with homemade blackberry jam and "homegrown" honey

My husband has always wanted me to learn to make homemade biscuits, and I've resisted for more years than I care to mention. Years I tell you. I've tried lots of different frozen and refrigerated biscuits, and some of them are really quite good, but there is just some mystique about real homemade biscuits.

I blame my mother. Seriously. Because she was not really a biscuit maker, either.

My paternal grandmother made probably the best biscuits ever. Huge and fluffy white on the inside, brown on the top and bottom, they were the champagne of biscuits. Many years ago my dad even talked his mother into giving up her huge stoneware bowl that she mixed her biscuits in so that my mother could have it. My mom tried, and she made some good biscuits, but they weren't the same, somehow. My sister and I used that bowl to make many a batch of chocolate chip or peanut butter cookies, but neither we nor my mother ever became real biscuit makers.

I guess he thought the "biscuit magic" came with the bowl, but some how it didn't transfer with the bowl. It was all in her head and in her hands. Memaw didn't measure anything; when it was time to make biscuits, she took out her big old bowl full of flour, made a little well in the center for the wet ingredients, and stirred till it was right. If she needed more flour, she stirred a little more into it from the dry flour that remained all around the outer edges of the bowl. Once it was "right", she patted out her biscuits and put them in an iron skillet to bake. Then she took the bowl with the rest of the still dry flour around the edges and set it back inside her cabinet next to the stove, till the next time she wanted to make biscuits. I never understood how she kept that whole bowl of flour from turning into one big gunky mess--I think it was the "magic".

So it was with much trepidation that I decided to tackle the huge (to me) task of learning to make biscuits. After researching several different options, I sort of made up a recipe that works for me. I still have some tweaking to do, but this is it so far.


Ingredients:

  • 2 c self-rising flour (I know, it's pitiful, but it's just what I use!)
  • 1/2 t baking powder (just in case)
  • 1 T sugar
  • 1/2 c butter
  • 3/4 c buttermilk
Stir together dry ingredients in large mixing bowl. Cut in butter until all of the lumps are gone and the mixture resembles coarse crumbs. Add buttermilk and stir until a sticky dough forms.
At this point, most recipes tell you turn out onto a floured board and roll out, then cut with a biscuit cutter, or the top of a glass if you don't have a biscuit cutter. And you can do that if you want to. However. Everyone that I ever knew that made self-respecting southern biscuits formed their biscuits with their hands. So that's what I do.

Flour your hands, and work the dough in the bowl into a ball, adding just enough flour so that the dough loses it's stickiness, but not so much that it gets dry. I divide my ball of dough into half, then half again, and so on, until I have eight little wads of dough. Then I roll the little wads into little balls in my hands and pat them out, much as I do when I make hamburger patties. I put them into a well-seasoned iron skillet, and bake at 400 degrees for about 20 minutes, give or take a couple of minutes, or until the biscuits are lightly browned on top.


Now, these are still not the big fluffy biscuits my grandmother used to make. I'm still working on that. But I've made these twice, and they taste good. The batch pictured didn't rise as well as it should have, and I discovered later that the almost used up flour was a wee bit past it's usefulness for baking. Not bad or anything, but if you insist on using self-rising flour, as I do, you have to make sure it's the freshest self-rising flour possible. I just picked up the wrong bag out of my pantry. I also think that next time I'm going to increase the ingredients somewhat, proportionately, of course, so I can make these bigger and fatter, and hopefully, fluffier.

edited to add: You can substitute shortening for the butter, and what we in the south call "sweet milk" for the buttermilk, but if you use regular milk, I would add just a bit more baking powder--maybe another 1/2 teaspoon or so. 

I've made these many times since this was first posted, and they're always a big hit with my family! 


We ate these with the fresh blackberry jam I'd just made, and some wonderful homegrown honey from my brother-in-law's own hives. Ummmm... (yes, that's the same picture I used with my post about the jam!)
For links to more recipes see:
Foodie Friday at Designs by Gollum
Recipe Swap at the Gorcery Cart Challenge
Tempt my Tummy Tuesday at Blessed with Grace
Tuesdays at the Table at All the Small Stuff
Tasty Tuesday at Balancing Beauty and Bedlam
Until next time, good cooking, and good eating!