Tuesday, July 14, 2009

Oatmeal, the Non-Instant Almost Instant Version


I grew up eating instant oatmeal--I mentioned in an earlier post that my mother was never much of a biscuit maker. Truth be told, she wasn't much of a breakfast person. We ate lots of toast, cold cereal, pop-tarts, "canned biscuits" and instant oatmeal growing up. My husband has always loved oatmeal, but with him it has to be "real" oatmeal, not instant.

From time to time on weekends we have oatmeal and toast--since our son doesn't eat oatmeal and never has, it's a just-the-two-of us breakfast, usually cooked by hubs, made the regular, old-fashioned way on top of the stove.

Somehow, somewhere I found that I like regular, non-instant oatmeal with raisins--they have to be cooked in the oatmeal, not just added afterwards, but I seldom had it like that because hubs doesn't like raisins in his oatmeal. It seems like too much trouble to dirty up a pot and make oatmeal with raisins for just one person...

until.....

I read about cooking it in the microwave.

Hello....there are microwave directions right on the box! Why have I never thought about this?

Maybe because it smacked of instant?

I don't know the answer to that question, but since I realized I could do this, I've had oatmeal-for-one (with raisins!) for breakfasts, lunches, even late-night snacks. It's so simple, I can't believe I haven't been doing this for years.


This is what you need:
  • 1/2 c Oatmeal
  • 1 c water or milk or both
  • Butter, raisins, white or brown sugar or honey or whatever you want to add

Measure 1/2 cup of oatmeal into an oversized (important!) bowl, add 1 c of water or milk or any combination of the two--I usually do a half cup of each.


Microwave for two minutes. Add 1-2 tablespoons of raisins, and microwave another minute. For this last minute, especially, WATCH CLOSELY, and pause the microwave if it foams up. Once it subsides, resume cooking. Use a potholder or dishcloth to remove from the microwave, it will be hot.


Add your butter or cream, and whatever sweetener you choose. I like brown sugar with a sprinkle of cinnamon some days, other days just plain old white sugar. Of course you could add Splenda or another sweetener if you choose.
And now--I'll think I'll make myself some oatmeal for supper. With raisins.
Until next time, good cooking, and good eating!


Thursday, July 9, 2009

Baked Chicken and Rice

I'm bumping this post up in order to participate in the Ultimate Recipe Swap (Chicken edition!) at Life as Mom, and Tasty Tuesday at Balancing Beauty and Bedlam

Originally posted March 2, 2009:


I've been at home in Louisiana for the last ten days or so. I have two homes--my house in Louisiana, and a furnished, corporate apartment, currently in Georgia. When I'm home, as in HOME home, in Louisiana, I tend to not cook as much because life has a sort of temporary, almost "vacation"-like quality. One dish that I do tend to make a lot at home, though, is baked chicken and rice. I developed this version when I was working full time, involved in ministry, taking care of family, trying to figure out main dishes that I could just throw together and let it cook at the end of a busy day. I hate to admit how often I used to make this, just because it's so easy! But as a result, it's one of my son's favorite meals that speaks of home.

I make this in a large covered casserole dish or dutch oven--my favorite is a 4 1/2 quart Corning Ware baking dish with a clear glass lid.

Ingredients:

  • 1 c uncooked long-grain rice
  • frozen boneless skinless chicken thighs
  • 1-2 t chicken stock base or bouillon
  • dried onion flakes

Mix together 1 cup uncooked rice, 1 cup of water, and 1-2 t chicken stock base or bouillon, dried onions and little pepper directly in your cooking-sprayed or lightly greased casserole dish. I use IQF (individually quick frozen) boneless skinless chicken thighs in this, which I buy by the bag from Sam's Club--it has all of the convenience of boneless, skinless breasts, but is less expensive, more moist, and I think tastes better. Lay unthawed chicken on top, sprinkle with seasoning mix (I use Tony Chachere's); cover, and bake a 350 degrees for at least an hour. I usually cook it a little longer, because we like the rice to get browned and "crusty" right around the edge.

Steam some veggies in the microwave, add a pan of quick rolls to the oven, and you have an easy meal that still means "home cooking" to your family.

Notes:

If you use frozen boneless, skinless breasts, add 1/2 c extra water or broth--they tend to be dryer than the thighs

You can substitute broth or stock if you have it, for the water and chicken stock base--I love the Tone's chicken stock base, also from Sam's Club--it's a paste, not a powder, and has the best flavor of any I've tried. I've also used onion soup mix instead of stock base and dried onions--it's a different taste than using the chicken stock base, but just as good.

I love this recipe for the "fix it and forget it" quality--I can come in from a long day, throw this together, get it in the oven, and still have some time to put my feet up and catch on world events while it cooks. If I get sidetracked and it cooks a little long, the rice may get a little brown around the edges, but the cover keeps it from drying out completely--perfect for those times I get carried away catching up on blogs or emails!

Until next time, good cooking, and good eating!

Thursday, July 2, 2009

Buttermilk Biscuits the Easy Way

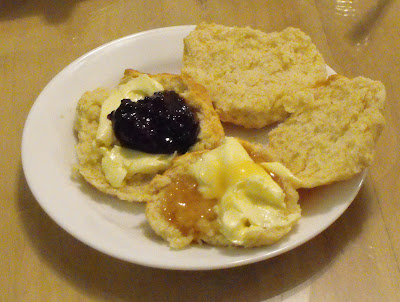
Buttermilk biscuits with homemade blackberry jam and "homegrown" honey

My husband has always wanted me to learn to make homemade biscuits, and I've resisted for more years than I care to mention. Years I tell you. I've tried lots of different frozen and refrigerated biscuits, and some of them are really quite good, but there is just some mystique about real homemade biscuits.

I blame my mother. Seriously. Because she was not really a biscuit maker, either.

My paternal grandmother made probably the best biscuits ever. Huge and fluffy white on the inside, brown on the top and bottom, they were the champagne of biscuits. Many years ago my dad even talked his mother into giving up her huge stoneware bowl that she mixed her biscuits in so that my mother could have it. My mom tried, and she made some good biscuits, but they weren't the same, somehow. My sister and I used that bowl to make many a batch of chocolate chip or peanut butter cookies, but neither we nor my mother ever became real biscuit makers.

I guess he thought the "biscuit magic" came with the bowl, but some how it didn't transfer with the bowl. It was all in her head and in her hands. Memaw didn't measure anything; when it was time to make biscuits, she took out her big old bowl full of flour, made a little well in the center for the wet ingredients, and stirred till it was right. If she needed more flour, she stirred a little more into it from the dry flour that remained all around the outer edges of the bowl. Once it was "right", she patted out her biscuits and put them in an iron skillet to bake. Then she took the bowl with the rest of the still dry flour around the edges and set it back inside her cabinet next to the stove, till the next time she wanted to make biscuits. I never understood how she kept that whole bowl of flour from turning into one big gunky mess--I think it was the "magic".

So it was with much trepidation that I decided to tackle the huge (to me) task of learning to make biscuits. After researching several different options, I sort of made up a recipe that works for me. I still have some tweaking to do, but this is it so far.


Ingredients:

  • 2 c self-rising flour (I know, it's pitiful, but it's just what I use!)
  • 1/2 t baking powder (just in case)
  • 1 T sugar
  • 1/2 c butter
  • 3/4 c buttermilk
Stir together dry ingredients in large mixing bowl. Cut in butter until all of the lumps are gone and the mixture resembles coarse crumbs. Add buttermilk and stir until a sticky dough forms.
At this point, most recipes tell you turn out onto a floured board and roll out, then cut with a biscuit cutter, or the top of a glass if you don't have a biscuit cutter. And you can do that if you want to. However. Everyone that I ever knew that made self-respecting southern biscuits formed their biscuits with their hands. So that's what I do.

Flour your hands, and work the dough in the bowl into a ball, adding just enough flour so that the dough loses it's stickiness, but not so much that it gets dry. I divide my ball of dough into half, then half again, and so on, until I have eight little wads of dough. Then I roll the little wads into little balls in my hands and pat them out, much as I do when I make hamburger patties. I put them into a well-seasoned iron skillet, and bake at 400 degrees for about 20 minutes, give or take a couple of minutes, or until the biscuits are lightly browned on top.


Now, these are still not the big fluffy biscuits my grandmother used to make. I'm still working on that. But I've made these twice, and they taste good. The batch pictured didn't rise as well as it should have, and I discovered later that the almost used up flour was a wee bit past it's usefulness for baking. Not bad or anything, but if you insist on using self-rising flour, as I do, you have to make sure it's the freshest self-rising flour possible. I just picked up the wrong bag out of my pantry. I also think that next time I'm going to increase the ingredients somewhat, proportionately, of course, so I can make these bigger and fatter, and hopefully, fluffier.

edited to add: You can substitute shortening for the butter, and what we in the south call "sweet milk" for the buttermilk, but if you use regular milk, I would add just a bit more baking powder--maybe another 1/2 teaspoon or so. 

I've made these many times since this was first posted, and they're always a big hit with my family! 


We ate these with the fresh blackberry jam I'd just made, and some wonderful homegrown honey from my brother-in-law's own hives. Ummmm... (yes, that's the same picture I used with my post about the jam!)
For links to more recipes see:
Foodie Friday at Designs by Gollum
Recipe Swap at the Gorcery Cart Challenge
Tempt my Tummy Tuesday at Blessed with Grace
Tuesdays at the Table at All the Small Stuff
Tasty Tuesday at Balancing Beauty and Bedlam
Until next time, good cooking, and good eating!

Sunday, June 28, 2009

Blackberry Bounty 3--No-cook Jam


Did I mention already that my sweet husband brought home quarts and quarts of yummy fresh blackberries he picked himself? Between the two crust blackberry pie and the chilled blackberry pie I made, we also ate berries by the handful, and I had at least two bowls of berries with milk and sugar, one of my absolute favorite ways to eat berries of any kind.

And even after all of that, I still had berries left--enough to make this super easy jam. Because it's not cooked or heat processed, it has to be stored in the refrigerator or freezer, hence the other name for this--freezer jam. I made this a few years ago when I bought a whole flat of fresh strawberries, so it works for pretty much any kind of berries and also some other kinds of fruit.

This time around I used a different brand of fruit pectin and a slightly different technique from what I did before, so be sure to read the directions on your jelly-making-stuff.


Ingredients:
  • 4 cups crushed blackberries
  • 1 1/2 c sugar
  • 1 pkg Ball No Cook Freezer Jam fruit pectin
In a large mixing bowl, stir together sugar and fruit pectin. Add 4 cups crushed fruit, and stir at least 3 minutes longer, till sugar dissolves.
In order to get 4 cups crushed berries, I measured 4 cups of whole berries, poured them into a bowl, and smashed them up with my pastry blender. I poured the crushed fruit back into the measuring cup, and kept crushing a cup at a time until I got a full 4 cups. You could also use a potato masher, but my potato masher is in my other kitchen at home in Louisiana instead of with me in Georgia where I need it. That's the story of my life, but, I digress!
For berries and fruit with a lot of seeds, you may want to press about half of the fruit through a sieve or a jelly strainer. I didn't do this step, because I was using the last of the berries and I was afraid I wouldn't have enough left to make my full 4 cups. Also note--you want the fruit to be crushed, but not liquefied-the whole point of making jam vs. jelly is having some body to it.
And that's it! I ended up with three full freezer jam pints, and a little left over. I bought a package of special freezer jam jars (I did have a coupon!) but you could put this in any plastic container with a good seal.
Remember--because this is not cooked or heat processed, it must be stored in the fridge or freezer till you use it!
This goes really well with peanut butter...

Or on homemade biscuits...

And by a big coincidence(!), my super easy recipe for buttermilk biscuits will be coming up next!


This recipe is linked t0:

Tempt My Tummy Tuesday at Blessed with Grace

Tasty Tuesday at Balancing Beauty and Bedlam

Tuesday at the Table at All the Small Stuff

Works for Me Wednesday at We are THAT Family

Click on the links above to see more recipes and links!


Until next time, good cooking, and good eating!

Monday, June 22, 2009

Blackberry Bounty 2--Chilled Blackberry Pie


As I mentioned in my last post, my honey brought home lots and lots of handpicked blackberries. The first pie that I made turned out really well, but I wanted to try something different for the second one. This recipe is similar to a fresh strawberry pie that I make occasionally, although not often enough!


Ingredients:
  • 3/4 c sugar
  • 3 T cornstarch
  • 1 1/2 c water
  • 1 pkg blackberry jello (not pictured)
  • 3 c blackberries
  • 1 single crust pie crust


As in the previous post, I used my favorite pie crust recipe--refrigerated ready crust (!). Place crust in pie plate, and prick with fork--this keeps the crust from puffing up where it isn't suppose to.


Bake at 400 degrees until lightly browned. Not quite this brown.


While the crust is cooling, mix together sugar, cornstarch, and water. Cook on medium high heat until translucent to clear. Add jello, stir until dissolved. I couldn't find blackberry jello, so I used blackberry/raspberry fusion.


Allow the cooked mixture to cool slightly but not set, stir in blackberries, then pour into baked pie crust.


Refrigerate and allow to set for at least 30 minutes. As you can see, this one held together very well! Top with whipped topping and enjoy!

I didn't like this pie quite as well the first one--part of it may have been the jello--I'm not a big fan of raspberry flavored anything, so I thought the gel filling had a whang that wasn't to my personal liking. I also thought it was bit stiff or sticky--I should have remembered that when I make my strawberry pie, I don't use a whole box of strawberry jello as most recipes call for, I use only about 2 or 3 tablespoons. My husband thought it was a bit "seedier" than the other one, which is to be expected since the berries aren't actually cooked in this one.


Verdict: I would make this again if I could find blackberry or even blueberry jello, I just don't like the raspberry, even mixed with other flavors, and I would add only about 3 T of the jello powder, not the whole box.

This post is shared at:

Tempt My Tummy Tuesday at Blessed with Grace

Tasty Tuesday at Balancing Beauty and Bedlam

Foodie Friday at Desgins by Gollum

Recipe Swap at the Grocery Cart Challenge

Click over and fined links to other recipes, and see what's cooking around the blogosphere.


Stay tuned for the easy blackberry jam I made!


Until next time, good cooking and good eating!

Friday, June 19, 2009

Blackberry Bounty--Pie a la Mode


My sweet husband has come home from work three days this week with fresh blackberries, picked from wild berry patches growing out around his job site. He stayed late in the heat and picked berries, braving not just the heat but the chiggers and brambles, and brought us home quarts and quarts of beautiful fresh ripe berries. All he requested was a cobbler "like his grandma used to make" with two crusts.

Now you have to understand, I don't do pie. I do make really good peach or pear cobbler, but those involve making a batter that cooks into a thick, almost cake-like top, nothing like the traditional pie crust style cobbler. So I searched out and found this recipe for blackberry pie and decided to try it.


As you can see, I used my trusty regular pie crust recipe--Pillsbury Ready Crust(!)

The other ingredients are:

  • 3 cups fresh blackberries
  • 1 c sugar
  • 3 T corn starch
  • 2 T butter


The directions stated to put the berries in the bottom crust, then sprinkle with sugar and corn starch and dot with butter.


The top crust I cut in strips and latticed-it---you real pie bakers out there just be quiet, I was really impressed with myself! Then I sprinkled just a little more sugar on top so it would have pretty little sugar crystals on top. I baked it about 35 minutes at 350 degrees.


This is what it looked like after it came out of the oven--my son even said, "Wow, mom, it looks like a real pie!" I was so excited, I could hardly wait for it cool off enough to cut into it.


Unfortunately, we had to eat it out of a bowl instead of on a plate! It tasted good, anyway--not too sweet, but just sweet enough, especially with vanilla ice cream on top!


If I make this again (and I probably will) I'd gently toss the berries with the corn starch and sugar, not put the corn starch on top. Besides not thickening enough, I had a couple of clumps of cornstarch right underneath the top crust that never dissolved. I might even increase the amount of corn starch by another tablespoon.

Verdict--this one's keeper!

Stay tuned this next week, I'll be sharing even more blackberry bounty recipes as I go!

This post is being shared at:

Foodie Friday at Designs by Gollum

Finer Things Friday at The Finer Things in Life

Recipe Swap at The Grocery Cart Challenge

Tempt My Tummy Tuesday at Blessed with Grace

Tasty Tuesday at Balancing Beauty and Bedlam

Until next time, good cooking, and good eating!

Monday, June 15, 2009

Microwave Fresh Corn on the Cob


I bought some fresh corn at the grocery store last week--still-with-the-shucks-and-silks-on-it fresh. One of my favorite ways to cook corn on the cob is to grill it, but unfortunately, the apartment complex we live in while we're in Georgia doesn't allow grills of any kind. I thought about trying to roast a few ears in the oven, but the heat has been so bad, and our apartment, facing the west, is H-O-T enough in the afternoons and evenings without having the oven on.

After a little research into different ways of cooking fresh corn, I decided in the interest of sparing us the heat to try it in the microwave. Even narrowing it down to microwaving left me with several different methods to try--wrapping it in wet newspaper, plastic wrap, steaming it in a little bit of water, all kinds of things.

What I finally decided to try tonight was cooking it still in the shucks. We had already peeled the shucks back and silked it, then folded the shucks back around it. I soaked three ears, with the shucks still attached, in plain water for several minutes. They float, so I weighted them down with a bowl, turning them after awhile so both sides got wet.

All of the articles/recipes I read had different cooking times, so I just picked a happy medium and went with 2 1/2 to 3 minutes per ear. I cooked three ears for a total of 9 minutes, rearranging them on the dish about half way through. After cooling for just a couple of minutes, I peeled the shucks back and easily cut them off, right at the base of the cob.

This turned out really well--the corn was tender, easy to eat on the cob (as hubs and son did) or to cut it off the cob (as I did). We each added a little salt and butter to taste, but it really doesn't need much of anything at all.

Now that summer time is well upon us here in the deep south, I'll be trying lots of things to help us beat the heat while still eating that good old southern-style food.


This recipe is shared at:

Tasty Tuesday at Balancing Beauty and Bedlam

Tempt My Tummy Tuesday at Blessed with Grace

Foodie Friday at Designs by Gollum


Until next time, good cooking, and good eating!