Sunday, October 24, 2010

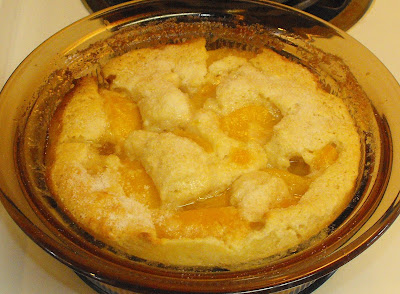
Sugar Free Sunday--Peach Cobbler

This week I took one of my tried and true quick and easy recipes for peach cobbler and converted it to sugar-free--and this one was a great success! I know it's kind of funny looking, but trust me, the picture doesn't do it justice.


Ingredients:
  • 1 c flour
  • 1 c Splenda (or sugar if you're not doing sugar-free)
  • 1 c milk
  • 1 stick butter or margarine
  • 1/2 c powdered milk (leave this out if you're using regular sugar)
  • 1 can of sliced peaches

Cut the butter or margarine up into small pieces, and place in the oven in your baking dish while the oven is preheating to 350 degrees.


Remove from the oven when the butter is melted.


Meanwhile, mix together the dry ingredients, then add the milk and stir until well blended. (Don't forget the powdered milk if you're using Splenda--because Splenda dissolves more easily than sugar, the powdered milk creates the bulk you need when baking.) This makes a very thin batter, regardless of which sweetener you use.

Pour the batter into the melted butter in your baking dish.

Then add the peaches. I use the peaches canned in either juice or light syrup, drained of almost all of the juice. My mom makes a regular (not sugar-free) version of this, and she puts juice and all. I find that if I do that, especially in the round dish that I usually use, I have a hard time getting the center to firm up. She usually uses a sqaure dish, and her resulting cobbler is little more juicy than mine. Either way is delicious.

Bake at 350 for about 25 minutes or so, or until the top browns and the center is set.

The only difference I found in the sugar-free version is that it doesn't brown the same. At this point I usually sprinkle just a bit more sugar on top and let it sort of crystalize on top--doesn't work with Spenda, though!

This quick and easy dessert is one that's great hot or cold, plain or served with cream, whipped topping, or even vanilla ice cream. I've made the regular (not sugar-free) version with both peach and pears---the only difference in recipes is that I usually add a little cinnamon when I make use pears. I think this would be good with cooked apples, as well.

Thanks to Chaya from Sweet and Savory and Comfy Food Blog for linking Dulce De Leche Half-Moons and Dried Fruit Bars to the last Sugar-Free Sunday!


This post it linked to:
Meatless Monday at My Sweet and Savory
Mouthwatering Monday at A Southern Fairytale
Just Something I Whipped Up at the Girl Creative
Tasty Tuesday at Balancing Beauty and Bedlam
Tempt My Tummy Tuesday at Blessed With Grace
Slightly Indulgent Tuesday at Simply Sugar & Gluten Free
Until next time, good cooking, and good eating!

Friday, October 15, 2010

Soup-er Simple---Chicken Corn Chowder


You know I'm all about quick and easy in the kitchen, and what fits that bill better than a one-pot meal like soup? I happen to like soup, stew, and chili year-round, but the beginning of (slightly) cooler weather really brings it out in me. This week I decided to try this practically fool-proof version of chicken corn chowder, made up almost exclusively of canned items that you can stock up on when they go on sale and keep in your pantry practically indefinitely.

Ingredients:
  • chicken--I used 5-6 boneless, skinless chicken thighs
  • 2 cans cream of chicken soup
  • 2 cans cream of potato soup
  • 1 can cream style corn
  • 1 can whole kernel corn
  • 2 cups milk

The original recipe for this stated to cube up the chicken and saute in 1/2 stick of butter, along with some onions, until the chicken was done. My chicken was frozen, so I cooked it in some chicken stock with some dried onion flakes. Once the chicken was done, I diced it up, and saved the stock to use later in another recipe. Mix together the cream of chicken and potato soup and the corn, and add the diced chicken. This will be a very thick mixture, so heat it slowly on between low and medium. Cook for a few minutes to blend flavors, then add milk and additional seasonings to taste. (I added some Tony Chachere's Creole seasoning blend and some additional dried onion flakes.) Add the milk, and stir well, then heat, again slowly, making sure not to boil after the milk is added. And voila', quick and easy chicken corn chowder.

I really liked the simplicity of this recipe, but I did find it just a bit sweet tasting. Next time I'll use only whole kernel corn, I think that would make a bit of difference.

What "Soup-er Simple" one-pot meals do you like to make during these cool(-er) months?

This recipe is linked to:

Foodie Friday at Designs by Gollum

Food on Friday at Ann Kroeker

Recipe Swap at the Grocery Cart Challenge

Recipe Swap at Prairie Story

Tuesday Night Supper Club at Fudge Ripple

Tempt My Tummy Tuesday at Blessed with Grace

What's Cooking Wednesday at King's Court IV

Ultimate Recipe Swap at Life As Mom

Until next time, good cooking, and good eating!

Saturday, October 9, 2010

Sugar Free Sunday--Cheesecake, Part 3

Welcome to this week's edition of Sugar-Free Sunday! I'd love to have you link your sugar-free, reduced sugar, or no-sugar added recipes, as well as product reviews or recommendations for sugarless products.


After last week's less-than-spectacular apple noodle kugel, I wanted something else to satisfy my sugar-free sweet tooth, so I decided to whip up a quick and easy sugar-free cheesecake, crustless again, but this time with a sour cream topping.


Ingredients:

  • 2 8oz pkgs cream cheese, softened
  • 3/4 c sugar or Splenda
  • 2 eggs
  • 2 t vanilla
  • 2 T flour

Mix all ingredients, and spread in a greased or cooking-sprayed pie plate. Bake at 350 degrees F for about 25 minutes, or until puffed and "set" in the middle, and browned around the edges. At this point it will look beautiful and puffy, but it will "de-puff" and settle when it cools.

Meanwhile, mix for topping:

  • 8 oz sour cream
  • 1/2 t vanilla
  • 2 T sugar or Splenda

Spread the topping over the cheesecake, then return to the oven for an additional 10 minutes or so, to set the topping. Cool completely and serve as is or with fresh fruit.


I may be getting slightly cheesecake obsessed--this is the third sugar-free version I've done. They're all fairly similar, but I think I like this one the best so far!

Thanks to Chaya from my Sweet and Savory for linking her Apple Rice Pilaf with toasted almonds last week!


Until next time, good cooking, and good eating!


This post is linked to:

Meatless Monday at My Sweet and Savory
Tempt My Tummy Tuesday at At the Well
Tasty Tuesday at Balancing Beauty and Bedlam
Tuesday at the Table at All the Small Stuff
Tuesday Night Supper Club at Fudge Ripple
What's Cooking Wednesday at The King's Court IV

Monday, October 4, 2010

Sugar Free Sunday--Sour Cream Apple Noodle Kugel

Sugar Free Sunday is back after a brief hiatus! With all of the back-and-forth involved with our recent move, trying to get settled back into life in my small rural hometown in Louisiana, I took a break from doing much cooking--and I confess, from watching my sugar intake, to boot! I'm trying to get back on the straight-and-narrow again, though, so I hope to have some yummy goodies than be made either "regular" or sugar-free!


This week's recipe is a new one for me in any form, it's a sweet noodle kugel flavored with apples, sour cream, and cinnamon. I adapted it from a recipe I found in 1,000 Jewish Recipes by Faye Levy.

Ingredients:
  • 8 oz pkg of wide egg noodles
  • 3 T butter, melted
  • 1/2 c sour cream
  • 2 eggs
  • 4 T sugar (I used Splenda)
  • 1 t vanilla
  • 1 1/2 Golden Delicious apples, peeled, cored, and thinly sliced
  • cinnamon

The recipe I made this from called for a 14 oz pkg of noodles, but when I got ready to make it, I realized my package was only 8 ounces, so I basically made about half of the original. The first step is to boil the noodles--mine was actually wide noodle dumplings--for about 5 minutes. They won't be fully tender, but you don't want them to overcook and turn into mush later. Rinse well with cold water, and pour into a medium mixing bowl. Add about 2 tablespoons of melted butter, and stir to coat the noodles. Add the sour cream, vanilla, 2 tablespoons of sugar or Splenda, and the eggs, mixing well. Stir in about half of the apples. Pour half of the noodle mixture into a greased or cooking sprayed 9 x 9 casserole. Add a layer of sliced apples, then sprinkle with cinnamon and some additional sugar or Splenda. Top with remaining noodle mixture, and more cinnamon and sugar or Splenda. Cover, and bake for 30 minutes at 350 degrees. Uncover and cook and additional 10-15 minutes. Serve warm.

Kugel does not photograph well! It tasted better than it looks in this picture, but I would make some changes to this recipe if I make it again. The apples to be mixed with the noodles should have been diced--the slices don't really cook through enough, and it's hard to "mix in" slices. It also needed more liquid of some kind--maybe an additional egg or more sour cream--I thought it was just a bit dry, although since I've never made a noodle kugel, I didn't exactly know what to expect. I actually liked the taste of it--the sour cream, apples, and cinnamon made a good combination--so this is a maybe-if-adapted keeper.

How about you? Have you made any sugar free or adaptable to sugar-free recipes lately? Be sure to link up!


Until next time, good cooking, and good eating!

This post is linked to:

Meatless Mondays at Sweet and Savory

Mouthwatering Mondays at a Southern Fairytale

Monday, September 27, 2010

Banana Nut Cake with Cream Cheese Frosting

I hope to return to regular Sugar Free Sunday posts starting on October 3rd. Meanwhile, enjoy this yummy full-sugar, nothing-but-goodness cake!


My husband has never been one for fancy decorated cakes--he always requests a home baked cake for his birthday, usually chocolate-on-chocolate. After eating more than his fair share of banana nut cake recently at the home of a family member, he surprised me by asking me to make one for his birthday this year. I called and asked for the recipe and made one for his birthday--and promptly turned around and made another the very next week! This is a wonderful, moist, cake, with just a hint of "real" banana taste--and the made-from-scratch cream cheese frosting makes it even better!


Banana Nut Cake


Ingredients:

  • 1/2 c butter, (one stick) softened
  • 1 1/2 c sugar
  • 2 eggs
  • 1 t vanilla extract
  • 8 oz sour cream
  • 2 c all-purpose flour
  • 1 t baking soda
  • 1/2 t salt
  • 2 medium bananas, peeled and mashed (about 1 cup)
  • 1/2 c chopped walnuts

Cream together butter and sugar; add eggs, vanilla, and sour cream, beating well after each addition. In a small bowl, stir together the flour, baking soda, and salt. Add the dry ingredients to the sugar-butter mixture, and mix--this will be very stiff--then add in the mashed banana. Add chopped nuts, and stir to incorporate. I baked this in a greased sheet cake pan, about 15 x 10, 20-25 minutes, at 350 degrees. Allow to cool, then frost with cream cheese frosting, below.


Cream Cheese Frosting


Ingredients:
  • 8 oz cream cheese, softened
  • 1/2 c (1 stick) butter, softened
  • 2 t vanilla extract
  • 1 box (about 3 1/2 cups) powdered sugar
  • 1-2 T milk (if needed)

Make sure that the butter and cream cheese are well softened, then cream together with vanilla extract. Add the powdered sugar and mix well. This will be very stiff, especially at first. The first time I made this, I thought my mixer was going to bog down, so I added a dash of milk. It made the mixing easy, but the end result was soft--since I made a sheet cake, it still worked, but it would have been a little too soft to frost the sides of layer cake, for instance. The second time I made it, I just persevered with the mixer, lifting it from the mixture once of twice to clear the beaters, and it did all cream together to make a luscious, thick frosting. And left lots on the beaters to lick off afterward, too. All by myself.


I'm not usually much of a "banana nut" gal myself--I didn't even taste this when we were visiting, and would have never picked this to try if my husband hadn't asked for it--but I'm so glad he did! This has no artificial pseudo-banana flavoring, just real bananas, and it has such a subtle flavor--this is a keeper, for me as well as the rest of the family.

Until next time, good baking, and good eating!

This post is linked to:
Meatless Monday at Sweet and Savory
Mouthwatering Monday at a Southern Fairytale
Tempt My Tummy Tuesday at Blessed with Grace
Just Something I Whipped Up at the Girl Creative
Tasty Tuesday at Balancing Beauty and Bedlam
Foodie Friday at Designs by Gollum

Tuesday, September 14, 2010

Chicken Pesto Pizza

To help get me out of my cooking and blogging and rut, I've decided to participate in the Foodbuzz Project Food Blog.

I love to eat. I'm not a gourmet, or a great cook; sometimes I'm not sure I'm even a good cook! What I am, though, is an ordinary woman who likes to cook most of the time, and likes to eat well-cooked food. I like simple recipes; and while some days I don't mind spending some time planning and executing a good meal, I usually don't want to spend all day in the kitchen. I like to cook a variety of dishes, made with everyday ingredients that are readily available and easy to stock up on and keep on hand in my pantry, refrigerator, and freezer. My recipes run the gamut from made-from-scratch to semi-homemade, but they are always simple, and usually delicious!

This first dish is a regular quick and easy, semi-homemade-from-what's-on-hand supper.

I came back to Georgia last week to help get the rest of our things packed and ready to move. A lot of my kitchen things and groceries have already been moved home, and I've been trying to figure out what to cook with the dribs and drabs of things left in the fridge and pantry, without buying a lot of additional groceries that would have be packed and moved or discarded when we leave. I found a "canned" Pillsbury pizza crust, and had about two boneless skinless chicken thighs in the freezer. I didn't think I had anything to use for sauce and was going to try to make a white cheese sauce when I spotted a jar of Pesto in the back of the fridge--perfect for one our favorite quick and easy meals--Chicken Pesto Pizza!

After spraying the baking sheet with cooking spray, I sprinkled a little corn meal over it and tapped it back and forth till a light dusting of corn meal covered it. This keeps the crust from sticking to the pan, the same as greasing and flouring a cake pan.Next I unrolled the crust, and precooked it for a few minutes, just until lightly browned--another trick I've learned to keep the crust from being "doughy" in the middle.


The pesto I used is Makers Mark from Sam's club, it's in the refrigerated section next to the fresh pasta, and is delicious--it has just the right mixture of olive oil, garlic, Parmesan cheese, and basil. Spread lightly, so the finished product won't get too soggy.


I boiled the two chicken thighs I had in some water with chicken stock paste, dried onion flakes, and Tony Chachere's creole seasoning, then chopped them up. You could use any leftover cooked chicken that you have on hand--even leftovers from a bought Rotisserie chicken.

Sprinkle with shredded mozzarella or Italian blend cheese.

Bake at 425 degrees for 7-10 minutes, or until the cheese is melted and the edge browns a little more.

Then just enjoy! The first time I used pesto, I did half Alfredo sauce and half pesto, in case everyone didn't like it, but it's become our new favorite! I could see adding additional ingredients, too, but even plain and simple it's delicious!

This post is linked to:

Slightly Indulgent Tuesday
at Simply Sugar & Gluten Free
Tasty Tuesday at Balancing Beauty and Bedlam
Tempt My Tummy Tuesday at At The Well
Tuesday at the Table at All the Small Stuff
Delicious Dishes at It's a Blog Party

Until next time, good cooking, and good eating!

Monday, September 13, 2010

Giveaway Winner-Macaroni Grill frozen meal for two


And the winner is:


Random Integer Generator

Here are your random numbers:

58

And #58 on the list is Lynda E, who stated that she would most likely share her meal with her husband, or she might make it for herself when he's away and have the leftovers for lunch! Linda, I'll be contacting you by email to get your shipping information.

Thanks so much to everyone who entered!