Wednesday, March 24, 2010

Make Your Own Easy Roux--in the Oven!


Two things in life that I dearly love are is a good chicken and sausage gumbo, and "real" brown gravy.

But up until now, my best gumbo came from a mix. Gravy, too.

Bayou Magic Gumbo mix is the best of the gumbo mixes, in my opinion. It has all of the seasoning, the dried ingredients, even powdered roux--all you have to do is add water or broth and whatever meat or seafood you want. It's good, but I wanted to learn how to make the real, rich, only-from-homemade gumbo. I tried some other packaged roux products, but none of them had that just right taste.

And as for making brown gravy, well, I could get it to look right, but not taste right.

And in both of these cases, the problem was in the roux--that mixture of flour and oil or grease, browned to perfection, that adds not just the thickener but a whole layer of flavor to the finished product. My problem with roux, I've discovered, is that I'm too impatient, I brown it too fast, and it doesn't have time to develop that good, rich flavor that adds so much to gumbo or gravy. And if it ever cooks too fast and burns, you have to throw it all out and start over again.

Years ago a co-worker gave me a recipe for a technique that made the roux in the oven. I passed it on to my family, but I never really tried it myself, I just stuck with my gumbo mix and gravy packets. Finally, though, I decided to bite the bullet and learn how to make this yummy base for myself.

After a quick phone call to my sister (who's husband swears by this technique) to refresh my memory of the details, I dove on in.

There are only two ingredients, oil and flour.

For this recipe, use one part oil to two parts flour. I used one cup of oil and two cups of flour.

Stir together until well combined. A few small lumps are okay, they'll eventually dissolve, but try to smush out the big ones.

Pour into your baking dish--I used Pyrex dish, about 8 x 8. If you make a larger quantity, just be sure that your baking dish allows room to stir.
Place in the oven at 375 degrees and set your timer for 30 minutes.

This is what it looked like after 30 minutes. I used self-rising flour because that's what I had on hand, so I'm not sure if regular flour would bubble like this, but eventually the bubbles cook out.

Stir well, especially scraping the sides. At this point it looked kind of like oatmeal.
Place back in the oven and set your time for about 20 minutes.

Again, stir, and return to the oven for 15-20 minutes.

See how it's starting to get smooth and brown? Trust me, it starts to smell good, too.

Continue to check on it and stir it every 15-20 minutes until it gets as dark as you want it. When I got to this point, I turned off the oven and let the residual heat continue to brown it for another 20-30 minutes...


Isn't this the most beautiful rich roux you've ever seen?? Next time I'm going to go for it and let it get even darker, but I was afraid it would get too dark and have that burnt taste that some roux gets.

My kitchen smelled so good!
After it cooled, I tasted it--did you know that oil and flour, if cooked correctly, have a taste? And it's a good one, too! This is not just a thickener, it's that added layer of flavor I've been missing.

And now you're ready to go! You can use it then, or let it cool and refrigerate it until you need it. You may get some separation when it's cool, with a small layer of oil rising to the top, but stir before you use it--just like with natural peanut butter.

If you're adding it to soup or stew or gumbo, spoon some roux into a bowl or big cup, add some warn broth or stock, stir well, and then add it to the pot--otherwise it will lump up.

For gravy, place a tablespoon or two in your saucepan, and heat slowly, whisking in the liquid to prevent lumps.

I hope you enjoy your roux, this is one technique that's definitely a keeper. I made the best roux I've ever made, and with my timer I was able to go about my business without being chained to the stove stirring constantly.
This post is linked to:
Foodie Friday at Designs by Gollum
Food on Friday at Ann Kroeker
Ultimate Recipe Swap at the Grocery Cart Challenge
Tempt My Tummy Tuesday at Blessed with Grace
Meatless Monday at Sweet and Savory
Tasty Tuesday at Balancing Beauty and Bedlam

Until
next time, good cooking, and good eating!

Tuesday, March 16, 2010

Green Fluff Salad for St Patrick's Day

In honor of Sping in general, and St Patrick's Day in particular, I'm repeating a recipe I've previously posted for Pistachio Salad, aka Green Fluff and/or Watergate Salad


Did you know that are just about as many different ways to make Pistachio fluff as there are folks who make it? I've had Pistachio Fluff on the brain ever since I had so many comments about it on my Pretty in Pink fruit salad post, so I decided to make that delectable dish known variably as "Pistachio Fluff", "Watergate Salad" and simply "that green stuff".

Back in the "olden days" of the 70's, different versions of this were all the rage. Some made it with cottage cheese, similar to the Pretty in Pink salad, some made it with miniature marshmallows, some topped theirs with chopped nuts; I've even seen it put in a pie crust. In my family, we made a very simple version, and that's the one I decided to re-create this week.


Ingredients:
  • 1 can crushed pineapple, drained
  • 1 pkg Pistachio pudding mix
  • 1 container Cool Whip or other whipped topping

Pour the drained pineapple into a medium sized mixing bowl, top with dry Pistachio pudding mix

Mix the pineapple and pudding mix together until it turns this lovely(!) shade of green


Add cool whip and stir until well blended

When you finish, it should look something like this.


At this point, it will taste like a mouth full of SWEET and not much else. Refrigerate for at least a couple of hours. The mixture will "set" slightly and the flavors will develop until it tastes like a mouth full of sweet, refreshing goodness.

I had forgotten how good this is--I took some to my mom and dad, and we decided we need to revive this one from the annals of family food traditions.

It doesn't make all that much compared to the pink one, that may be one reason why many add the cottage cheese and mini-marshmallows. I like the cottage cheese in the pink one, and may try it in this one, too, but it's good just the way it is, and would super simple to double or even triple to take to a church dinner or family gathering.

I guarantee anyone old enough to remember the 70's will remember it, and anyone not old enough to remember it will like it anyway.
This post is linked to:
Tempt My Tummy Tuesday at Blessed with Grace
Tasty Tuesday at Balancing Beauty and Bedlam
Tuesday at the Table at All the Small Stuff
Until next time, good (un-)cooking, and good eating!

Monday, March 8, 2010

Quick and Easy White Chicken Pizza


This last year I made a personal food "discovery"--my favoirte pizza of all time is made with chicken. Never in a million years would I have thought that I would like a pizza made with chicken. But chicken, alfredo sauce, and white cheese---oh, yeah, it's like nectar and ambrosia.

Not long ago, a lovely lady we know gifted us with an assortment of homemade yeast breads, one of which was a pre-baked pizza crust. I toyed with the idea of making a traditional red-sauce pizza, but when I found a jar of Alfredo pasta sauce in the food cabinet, I knew I was set.

For that first white chicken pizza, I used some frozen chicken breast tenderloins, which I cooked in a little chicken broth, then diced. One thing I've learned from making pizza in the past is that it always takes less sauce than you might think, so I very lightly sauced the top, then loaded it up with diced, cooked chicken, and covered it liberally (very liberally) with white cheese. I used what I had on hand, probably a mix of mozzarella, provolone, or Italian blend.

It was a huge success!

And now my delima--I'm a yeast bread wienie, unless I have my bread machine, which is in Georgia while I'm home in Louisiana for a while. I looked at packaged pre-baked crust in the store, but they seemed a little, ahem, shall we say steep for a big piece of round flat bread?

So I decided to recreate it this time using my old tried and true refrigerated pizza dough from a tube. Found next to the "canned" biscuits. Certainly you could make your own.

Ingredients:

  • pizza crust
  • Alfredo suace
  • diced, pre-cooked chicken
  • white cheese of your choice--mozarella, provolone, Italian blend
I started off my lightly greasing my cookie sheet, then sprinkling just a couple of pinches of cornmeal on the pan. I think that's to keep the crust from sticking, like when you grease and flour a cake pan, but I'm not really sure. They do it at pizza places, and I read it in a recipe once, so I do it, too.

The crust I had stated (33% more free), so I used a large pan, 15 1/2 x 10 1/2.


Pre-bake according to package directions. I baked this at around 400-425 for probably 10 minutes. Next time around I would not let it brown quite this much.


Spread alfredo sauce, from a jar or your own, very sparingly over the crust. The first time I used maybe a 1/3 c or less, but for one this size it took at least 1/2 c, maybe a little more. (tune in later this week to see what I made using the leftover sauce)


Cover with diced, cooked chicken. First time, I cooked some frozen chicken breast pieces, this time I used a bag of pre-cooked, seasoned chicken strips (the kind that look like chicken fajita strips). I heated them in the microwave just to thaw them and take the chill off, maybe 3-5 minutes. These were good, and certainly easy, but I think I liked the one with the regular cooked chicken breast better--this would be an good use of leftover cooked chicken of any sort, actually.


Cover liberally with white cheese. I used some parmesan, some Italian blend, and even some monterray jack this time around. Last time I think I used provolone and mozzarella.


Bake at 400-425 degrees F for 10-15 minutes, until the cheese is melted, and the tops of the little chicken pieces start to slightly brown.

The two of these that I've made were distinctly different, but both were successes. This a definite keeper, so much so that I may attempt an even more home-made version--the refrigerated pizza dough will have to do until I get back to my bread machine, but I will pre-cook some chicken, and I think I'm going to make the alfredo sauce and see how it goes.

For myself personally, I would to try this mushrooms added; for those who like it, certainly onions and/or peppers could make a pretty addition (can you imagine some chopped purple onion--would that make a "lavender" pizza instead of a white pizza??) What toppings does your family like on pizza?

This post is linked to:

Tasty Tuesday
at Balancing Beauty and Bedlam
Tempt My Tummy Tuesday at Blessed with Grace
Foodie Friday at Designs by Gollum
Recipe Swap at the Grocery Chart Challenge
Food on Friday at Ann Kroeker

Until next time, good cooking, and good eating!

Sunday, March 7, 2010

Giveaway Winner--Mossy Bayou Foods

A big "Thank you!" to everyone who entered the Mossy Bayou Foods giveaway.


Chosen by random integer generator at http://www.random.org/, the winner is:

Random Integer Generator

Here are your random numbers:

14

Timestamp: 2010-03-08 00:07:36 UTC

And #14 on my Google Docs spreadsheet is:

Sharon A.

I'll be sending Sharon an email tonight.

Even if you didn't win, you can still enjoy any of the Mossy Bayou Foods products by visiting their website at http://www.mossybayou.com/, and placing an order. (Note: for the chow chow and pepper jelly, click on "Links" subheading on their right sidebar and follow the links to a third party site that sells some of their products.) The more I use the hot sauce and the seasoning blend, the more I like them!

Please come back later this week for more recipes and food fun.

Until next time, good cooking, and good eating!

Saturday, February 27, 2010

Swamp Scum, Bayou Blend Seasoning, and a Mossy Bayou Giveaway!

(Giveaway Now Closed)

I recently had the opportunity to try some of the products available from Mossy Bayou Foods. They sent me a bottle of their award winning Swamp Scum hot sauce, their Bayou Blend seasoning blend, and a package of their Cajun Fried Pecans. Being a Louisiana gal myself, I was eager to receive these products and give them a try.

First up was the Bayou Blend seasoning mix. I first applied the sniff test, and it smelled strongly of chili powder, so I was a bit apprehensive about it--I like Cajun seasoning and I use it almost everything, but I'm not a big fan of hot just for the sake of hot. Once I used it, this stuff put my fears to rest. I used it in every kind of savory dish imaginable, from vegetables to meat to gravy, just as I would any good seasoning blend. It's spicy without being too hot--Mossy Bayou's website describes it as "a special blend of Cajun spices, with an added Mexican accent". It has no salt, which surprised me, and no MSG.

The next product that I tried was the mysterious Swamp Scum hot sauce. This is not your typical hot sauce--for one thing, it looks black in the bottle, and when you use it the color is sort of greeny-black. Not a pretty sauce. But the smell--ahh, the smell is wonderful! It has the most delicious sweet/spicy/smoky smell. Even though I'm from Louisiana, I'm particular about the hot sauce I use. As I mentioned above, I don't like "hot" just for the sake of heat, I like flavor with my spice, and this one also did not disappoint. I used this on chicken fajitas, and as a seasoning on a Cajun spiced pot roast that came out melting-in-your-mouth good. It may not look pretty, but it's a definite keeper for me.

And last but not least, the Cajun Fried Pecans--I love roasted pecans, and these were a tasty change from the usual sweet pecans I enjoy when I can.

And now, for the fun part--Mossy Bayou is sponsoring a giveaway package for one lucky reader, comprised of :
  • Swamp Scum hot sauce
  • Bayou Blend seasoning
  • Louisiana popcorn rice
  • Original Cajun Chow Chow
  • Pepper Fiesta Pepper Jelly

This could help you feast on good old Cajun food for some time to come!

The giveaways is now closed--thanks for your interest!

To enter, leave your name, email address, and comment on the giveaway form telling me which Mossy Bayou product you'd most like to try. The giveaway will be open until next Sunday, March 7, 2010, at 6:00 p.m. central time.

As always, your information will not be shared, and will be used for the purposes of this giveaway only.


(Disclosure: I received the products listed above for review and promotional purposes only, and did not receive any other compensation for doing the review or the giveaway, and the opinions expressed are those of my own.)

Until next time, good cooking, and good eating!

Friday, February 26, 2010

My Quick and Easy Hamantaschen

I had hoped to get this post up a little earlier, but while I'm at home in Louisiana I'm on dial-up internet most of the time, so posts come much slower!

Sunday is Purim, the celebration of the deliverance of Israel from the hand of the enemy as told in the book of Esther. I thought I'd share this quick and easy version of hamentaschen, or Haman's hats, that I came up with a few years ago. (hiss, hiss, stomp, clap) (In order to obliviate the very name of Haman, who schemed to destroy God's people, when the story of Esther is read or told, the audience must hiss or stomp or use noisemakers anytime his name is mentioned--thus the "hiss, hiss, stomp, clap"!)


Ingredients:
  • pie crust--for this I want a smooth, even crust, so I use my old faithful ready-made crusts
  • pie filling of your choice--I like cinnamon spice apple, or blueberry
  • powdered sugar to sift over the finished product
You need a pie filling with small "bits", so when I do this with apple filling, I use my pastry cutter to smash the pieces so that I have smaller pieces of fruit.

Use a biscuit cutter or the top of a glass to cut as many circles as you can get from your pie crust. You can take the bits that are left and re-roll and cut again, if you like.

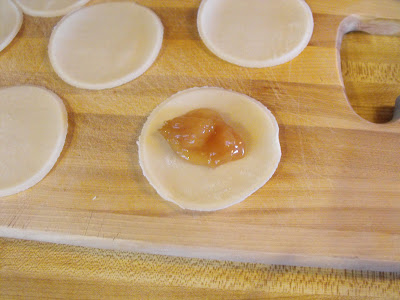
Place a small amount of the filling on each circle--I used a heaping tablespoon, and almost overfilled some of mine.

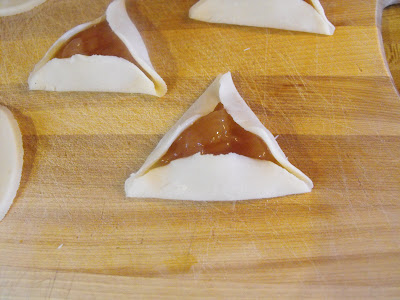
Fold the sides up into the traditional three-cornered hat shape.

It's been a couple of years since I made these, and the first batch I did started coming apart at the corners when they started baking, so I really pinched the corners together on the next batch.


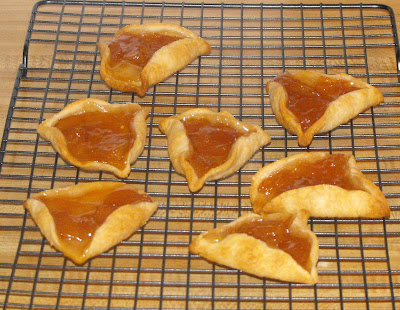
Bake at 400-450 degrees for 15-20 minutes. Remove from the baking sheet to a cooling tray. (This was the first batch--see how they started coming apart? Still tasted good, though!)


Dust with powdered sugar right before serving.

These are so good--I'm not usually a big fan of fruit pies, especially apple, but these just the right proportion of crust to filling--and big dollop of whipped cream on top doesn't hurt any, either! (I suspect they would be good with a scoop of vanilla ice cream, too, but they never seem to last long enough for me to get to try that.)

This post is linked to:

Foodie Friday at Designs by Gollum
Tempt My Tummy Tuesday at Blessed with Grace
Meatless Mondays at Sweet and Savory
Tasty Tuesday at Balancing Beauty and Bedlam

Until next time, good cooking, and good eating!

Monday, February 22, 2010

Sour Cream Pound Cake--Made From a Mix!

I've been in a food rut. Again. Since the holidays I've been cooking less in general, and not much that's been new or different or blog-worthy in particular.

This weekend I decided to jump back into the kitchen by making an old stand-by--what I call sour cream pound cake. It's a beautiful basic cake that can be eaten plain, warm from the oven, dripping in strawberries and whipped cream, or frosted. I usually make this in an angel food style tube pan, but I've also made it in a bundt pan, as a sheet cake, in loaf pans, and even as cupcakes.

It's a cake that starts from a mix but becomes so much more by the addition of a few key ingredients.

Ingredients:

  • Duncan Hines Butter Recipe Golden cake mix
  • 1/2 c sugar
  • 1/2 c cooking oil
  • 8 oz container sour cream
  • 4 eggs

Mix all ingredients until blended, then beat for 2 minutes on medium speed. Pour into a cooking sprayed pan. For a tube pan, bake at 350 degrees for 50 minutes. At the end of 50 minutes, I turn the oven off, and leave the pan in the oven for an additional 10 minutes.

If I use a removal center tube pan (like an angel food cake pan), I remove the outside ring and allow the cake to cool on the inner ring. (If you try to take it off the ring too soon, it will probably fall apart, or at least crack). When I use a bundt pan, I cool for about 15 minutes, then turn it out onto a rack to finish cooling.

This time, I left it completely plain--sometimes I sift powdered sugar over the top.


This is one of those cakes that's delicious eaten plain, warm from the oven, but it also gets better and better the longer it sits--just be sure to cover it well.


I love this cake--so easy to make, but it tastes like you really did something special. I make it often in two loaf pans to give as a gifts, and nearly always get a recipe request.

This post is linked to:
Tasty Tuesday at Balancing Beauty and Bedlam
Tempt My Tummy Tuesday at Blessed with Grace
Tuesdays at the Table at All the Small Stuff
Until next time--good cooking, and good eating!