Sunday, July 17, 2011

Penne Rigota with Sausage and Marinara Sauce


Just in case you haven't noticed, I've been AWOL around here lately. I've been really busy with a new ministry position, I've had computer and internet issues, it;'s hard to cook for just one or two people, and besides, it's just been too hot to cook lately, anyway. They are, alas, just excuses. I sure manage to wrangle up something to eat, I just haven't done anything inspired lately.

So, I thought I'd share one of those quick, I'm the only one home for dinner, it's too hot to turn on the oven, I don't have much in the house anyway, but I gotta have something to eat, semi-homemade kind of meals.

Step one, put some pasta on to cook. Any kind will do. I used penne rigata.


Step two, find some meat of some kind, hopefully one that won't take that long to cook. I chose sausage, because it was what I had on hand and thawed. Slice it up and sort of fry it out or (my first choice) cover it with a little water and par-boil for a couple of minutes. It heats everything up and cooks out the excess grease. Drain the excess water and/or grease.


Step three. Pour on a jar of sauce. In this case, spaghetti sauce, and bring to a simmer. Cover and let cook for a few minutes. Add additional seasoning to taste.


Drain the pasta, pour on the sauce, add some cheese, and voila! Pasta supper for one, with enough leftovers to eat tomorrow.


Variations:


I love to use frozen chicken fajita strips with Alfredo sauce to make a quick chicken Alfredo.


This works with pretty much any kind of pasta, including leftover!


Do you have a basic semi-homemade go-to meal for those "I don't wanta cook but I'm hungry" times?


Until next time, good (semi-) cooking, and good eating!

Giveaway-Cascade Complete All in 1 ActionPacks

Giveaway is now closed!


One of my favorite kitchen tools of the "not absolutely necessary but it sure is nice to have one" sort is a dishwasher. Over the course of my adult life I've lived in a number of different places with a wide variety of kitchens--sometimes with a dishwasher, sometimes without--and while a dishwasher is not an absolute necessity for a kitchen, I definitely prefer a kitchen with rather without one.


But because I have a small family, I have to admit that there times, when I had a kitchen with a dishwasher, that I didn't always take advantage of the luxury. Sometimes it seemed like too much trouble when we didn't have that many dishes--since I was rinsing them anyway, it seemed to be just as quick to go ahead and wash them by hand. And the absolute worst is pulling out a dish that the dishwasher didn't get quite clean, only to find the residue practically baked on by the heat-dry cycle.


Enter in a new product in the Cascade line of dishwasher products--the new Cascade Complete All-in-1 packs. I love the convenience of using the packs--no pouring (or spilling) messy powders or gels, just pop one in the soap dispenser and run the cycle as usual--but get this--no pre-rinsing is necessary, these packs have the correct amount of Cascade dishwashing detergent, along with a grease cutter and a rinse agent so that every particle is broken down and powered away, and best of all--no spots or residue left behind!


These packs work even on dried on food, so if you have a small family, as I do, you can safely load your dishwasher and wait until the next day, if need be, to run a full load!


As a member of MyBlogSpark, Proctor and Gamble has provided me with 5 trial sized packs of their new Cascade Complete All-in-1 ActionPacks to give away. Then for those five who win the giveaway, each one who emails me a review of the product, will be eligible to win an additional prize of a $15 Wal-Mart Gift Card!


To enter, all you have to do is leave your name and email contact in the form provided, along with a comment telling me which meal you think leaves you with the most dishwashing challenges. This giveaway will run from today, July 17, through July 27 at 3:00 p.m. CST. Winners will be drawn at random.

Giveway is now closed! Thanks to all who entered, winners will be announced shortly!


(The prizes for this giveaway were furnished to me by Proctor and Gamble through MyBlogSpark; however, the opinion stated is that of my own.)


>

Wednesday, May 18, 2011

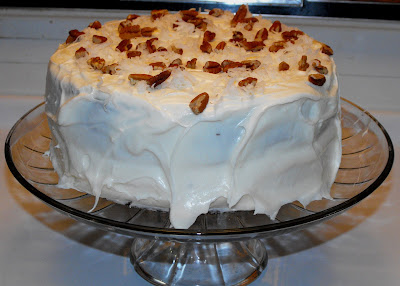
Italian Cream Cake

There's a thrift store in our little town that holds a bake sale on the first full weekend of the month, run by the ladies from the local Mennonite church. They always have such good things--pies, cakes, and cookies, along with breads and even homemade freezer meals. One of our favorites was always an Italian Cream cake, but as with lots of other things in this economy, the bake sale items have just about priced themselves out of my comfort zone. So I decided to try my hand at baking one of these luscious goodies myself.

The recipes I found all called for egg yolks in the main batter, then beating the whites separately and folding in. Since "quick and easy" is my middle name in the kitchen, I am not much of a multi-step, multi-bowl baker. Recipes that call for beating the egg whites and folding them in seem scary and overly complicated, so I just kept on looking until I found that called for whole eggs just plopped in the batter like the regular cake recipes I am used to making.


Italian Cream Cake

Ingredients:


  • 1 c buttermilk


  • 1 t baking soda


  • 1/2 c (1 stick) butter, softened


  • 1/2 c shortening


  • 2 c sugar


  • 5 eggs


  • 1 t vanilla


  • 1 t baking powder


  • 2 c all purpose flour


  • 1 c coconut


  • 1/2 c chopped nuts


  1. Dissolve baking soda in buttermilk and set aside


  2. Cream together butter, shortening, and sugar until light and fluffy


  3. Add vanilla and eggs--1 or 2 at a time, mixing well in between.


  4. Add buttermilk, flour, baking powder, and coconut, until combined


  5. Stir in nuts


  6. Pour into greased cake pan(s). I used two 8 or 9 inch rounds.


  7. Bake in a preheated 350 degree oven, 30-35 minutes (if you use a tube pan, it will take longer) or until a toothpick inserted in the middle comes out clean


Allow to cool completely before frosting


Cream Cheese Frosting


Ingredients:


  • 8 oz cream cheese, softened


  • 1/2 c butter, softened


  • 1 t vanilla


  • 4 c powdered sugar


  • 2-4 T cream or milk


  • 1/2 to 1 c coconut


  • 1/4 to 1/2 c chopped nuts


  1. Cream together cream cheese, butter, and vanilla


  2. Add powdered sugar and mix well, adding cream or milk as needed for desired consistency.


  3. You can add coconut and nuts into the frosting if like, or sprinkle on top like I did


I almost messed up by thinning my frosting just a bit too much--I usually make sheet cakes, that don't even come out of the pan, or tube cakes, where a softer frosting is better, to drip over the sides. This time, though, I wanted a nicer presentation in the form of a layer cake, and when I made a soft frosting, as usual, I had a little trouble trying to keep it from sliding off the sides. Next time I do a layer cake, I'll remember to make the frosting a little stiffer.


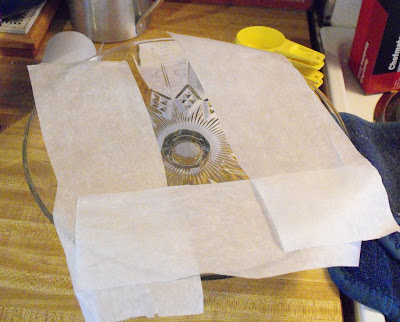
Since I was trying to make a pretty cake, as well as a delicious one, I wanted to use my pedestal cake platter. To keep the plate or platter clean while you're frosting the cake, put down a layer of strips or parchment or wax paper.


Then put the first layer on top of the paper strips. Make sure you have enough sticking out from under so that you can pull them out afterwards.

Frost the cake as usual, then sl-o-o-o-o-w-ly pull the paper strips out from under the edges.

I was so impressed with myself for making this cake--completely from scratch, and a layer cake, at that! Maybe I'll change my middle name from "quick and easy" to "made from scratch"!

Until next time, good cooking, and good eating!


This post is linked to:


What's on the Menu Wednesday at Dinning with Debbie
What's Cooking Wednesday at the King's Court IV
Delicious Dishes at It's a Blog Party
Recipe Swap Thursday at Prairie Story
Tasty Traditions at Coupon Cookin'
Try New Adventures Thursday at Alicia's Homemaking
Foodie Friday at Designs by Gollum
Sweet Tooth Friday at Alli N Son
Friday Potluck at EKat's Kitchen
Sweet Indulgences Sunday at a Well Seasoned Life

Friday, May 6, 2011

Hamburger Steak and Semi-Homemade Comfort Food

In case you haven't noticed, I've been in a food rut for weeks now. Not only have I not blogged about food, I've barely cooked. I find myself home alone several nights a week, and I end up doing what I call "scrounging"--eating anything I can "scrounge" up without doing any major cooking--sandwiches, cheese and crackers, soup, even (yes!) milk and cookies. But I'm running out of "scrounging" ideas, and I know I need to eat better. So one night this week when my son came home early and unexpectedly, I decided to make us a simple, semi-homemade dinner of pure comfort food. Hamburger steak is one of his favorites, and I'm a rice-and-gravy gal from way back (waaaaay back--even as a kid I loved rice and gravy, any time, any place.)

First up was the hamburger steak. I'm blessed to have home-grown, farm raised beef in my freezer from my mom and dad's cows, so I started with a pound of extremely lean beef. This stuff is so lean that when you cook it "loose", you usually don't even have to drain the grease off of it. That's lean.

Ingredients:


  • 1 lb lean ground beef

  • dried onion flakes (about a tablespoon)

  • 2 or 3 splashes of Worchestershire sauce

  • Tony Chachere's Creole Seasoning, or your all-purpose seasoning blend of choice

Sorry I don't have exact proportions, it all depends on your family's taste. I want mine to be pretty well seasoned. Mix everything in well, so that the seasoning is blended throughout the meat. The best way to do this is with your hands! Divide the meat up into however many portions you want to make. At this point, I always form the meat into a ball and pat it back and forth in my hands and kind of pack it so that it will hold together well. I do this when I'm making hamburgers, hamburger steaks, meatballs, or whatever. Then I squish it start forming it into the shape I want. For some reason, when I do hamburger steak, I make the patties big and sort of oval. I smooth the edges and re-pat so that little pieces of meat won't break off while it's cooking. Once you're done and have your hands clean, put a straight sided frying pan on the burner to heat, starting off on medium-to-medium-high heat. Since I was cooking with such lean meat, I added a little bit of cooking oil to my frying pan to keep it from sticking--if I was using bought ground meat, it usually has enough fat in it to skip the oil. Once the pan is hot, I add the meat. After a few minutes, check to see if the bottom is lightly browned, and turn so that the other side can brown.


While I was waiting for the meat to brown, I got the rice started, 1 cup of rice, 2 cups of water, bring to a boil, then cover and turn to simmer. It takes about 15-20 minutes for the water to absorb. You can salt the water if you want, sometimes I do, sometimes I don't.


Check the meat, and once both sides are browned a little, cover and turn the heat down to low-medium.


Meanwhile, I measured water and started it boiling to make my gravy. Yes, I used a brown gravy packet--that's what makes this semi-homemade! Not just any brown gravy, but Southeastern Mills. They make the best gravy mix--I like their brown gravy and their beef gravy, which is harder to find.


Once I got the gravy made, I poured it over the meat in the frying pan, covered it, and turned the heat to about 3 (out of 10) on my knob--low medium, I'd say. I wanted the gravy to simmer, the meat to continue to cook, but nothing to scortch.


And then on the the next semi-homemade part of my meal--frozen steam-in-the-bag-in-the-microwave veggies. My son and I both love this particular one--Bird's Eye Steamfresh Vegtables--the one with aspargus, white and yellow corn, and baby carrots. Love, love, love this one. All I did was cook according to package directions, pour into a serving dish, add a sprinkle of salt and couple of dabs of butter, then stir.


And there we had it--a plate of comfort food, semi-homemade, done in about about 30-40 minutes, start to finish.


I felt like I'd made a gourmet meal!


My hubby will be home next week, so I'm gearing up to get back into my cooking mode.


Until next time, good cooking, and good eating!


This post is linked to:

Foodie Friday at Designs by Gollum

Recipe Swap at the Grocery Cart Challenge

Recipe Linky at MomTrends


(Disclosure--I haven't been paid or compensated in any way by Bird's Eye or Southeastern Mills. These are just two products that I've tried on my own and like.)

Thursday, March 17, 2011

Green Fluff for St Patrick's Day

In honor of St Patrick's Day, I'm repeating this recipe for my favorite GREEN food,
Pistachio Salad, aka Green Fluff and/or Watergate Salad


Did you know that are just about as many different ways to make Pistachio fluff as there are folks who make it? I've had Pistachio Fluff on the brain ever since I had so many comments about it on my Pretty in Pink fruit salad post, so I decided to make that delectable dish known variably as "Pistachio Fluff", "Watergate Salad" and simply "that green stuff".

Back in the "olden days" of the 70's, different versions of this were all the rage. Some made it with cottage cheese, similar to the Pretty in Pink salad, some made it with miniature marshmallows, some topped theirs with chopped nuts; I've even seen it put in a pie crust. In my family, we made a very simple version, and that's the one I decided to re-create this week.


Ingredients:
  • 1 can crushed pineapple, drained
  • 1 pkg Pistachio pudding mix
  • 1 container Cool Whip or other whipped topping

Pour the drained pineapple into a medium sized mixing bowl, top with dry Pistachio pudding mix

Mix the pineapple and pudding mix together until it turns this lovely(!) shade of green


Add cool whip and stir until well blended

When you finish, it should look something like this.

At this point, it will taste like a mouth full of SWEET and not much else. Refrigerate for at least a couple of hours. The mixture will "set" slightly and the flavors will develop until it tastes like a mouth full of sweet, refreshing goodness.

It doesn't make all that much compared to the pink one, that may be one reason why many add the cottage cheese and mini-marshmallows. I like the cottage cheese in the pink one, and may try it in this one, too, but it's good just the way it is, and would be super simple to double or even triple to take to a church dinner or family gathering.

I guarantee anyone old enough to remember the 70's will remember it, and anyone not old enough to remember it will like it anyway.

This post is linked to:
Luck of the Irish Party at It's a Blog Party
Ultimate Recipe Swap at Life As Mom
Foodie Friday at Designs by Gollum

Until next time, good (un-)cooking, and good eating!

Wednesday, March 16, 2011

Quick and Easy Hamantaschen for Purim

Purim is coming up this Sunday, March 20th, so I am re-purposing this post for the occasion.


Sunday is Purim, the celebration of the deliverance of Israel from annihilation at the hand of the enemy as told in the book of Esther. As part of the celebration of God's deliverance, it's customary to give gifts of food, which often include hamentaschen, or Haman's hats, named after the villain of the piece. (hiss, hiss, stomp, clap) (In order to obliviate the very name of Haman, who schemed to destroy God's people, when the story of Esther is read or told, the audience must hiss or stomp or use noisemakers anytime his name is mentioned.)

Hamentaschen are little three cornered cookies or pastries, usually with fruit or poppy seed filling. I came up with a quick and easy version a few years ago that are actually more like a fruit tart, but made in the traditional three-cornered shape, I think they fit the bill quite nicely.


Ingredients:
  • pie crust--for this I want a smooth, even crust, so I use my old faithful ready-made crusts
  • pie filling of your choice--I like cinnamon spice apple, or blueberry
  • powdered sugar to sift over the finished product
You need a pie filling with small "bits", so when I do this with apple filling, I use my pastry cutter or a knife to cut the larger slices so that I have smaller pieces of fruit.

Use a biscuit cutter or the top of a glass to cut as many circles as you can get from your pie crust. You can take the bits that are left and re-roll and cut again, if you like.

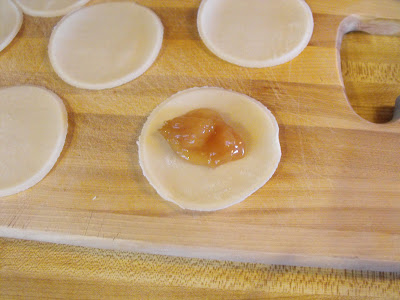
Place a small amount of the filling on each circle--I used a heaping tablespoon, and almost overfilled some of mine.

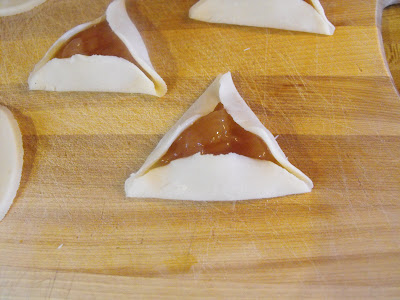
Fold the sides up into the traditional three-cornered hat shape.

It's been a couple of years since I made these, and the first batch I did started coming apart at the corners when they started baking, so I really pinched the corners together on the next batch.


Bake at 400-450 degrees for 15-20 minutes. Remove from the baking sheet to a cooling tray. (This was the first batch--see how they started coming apart? Still tasted good, though!)


Dust with powdered sugar right before serving.

These are so good--just the right proportion of crust to filling. You can offer these alone as a finger food, or serve on a plate with little dollop of whipped cream on top, or even in a bowl with a scoop of vanilla ice cream. Just be sure to give thanks everytime you eat one that God's ear is still open and His handis working behind the scenes to bring deliverance and salvation to those that call on His name!

This post is linked to:
What's Cooking Wednesday at the King's Court IV
Foodie Friday at Designs by Gollum

Until next time--good cooking, and good eating!

Saturday, January 8, 2011

Easy Cheesy Potato Soup


After all of the rich food and extra cooking around during the holidays, I like to start off the year with super simple, but warm and hearty meals--and for me, that spells S-O-U-P! Last week I made Taco Soup; today I made another of my favorite quick and easy soup recipes, Easy Cheesy Potato Soup. I first posted this back in August, but I know most of ya'll are not as soup-crazy as I am to eat it even during the warm months, so I thought I'd share it again.

Originally posted August 20, 2010:

I love soup, any kind, any time, any where. When I'm in a restaurant, I always get the soup instead of salad--and I know which places have good soup. One of my favorites, always, is potato soup of any kind--creamy potato, cheesy potato, baked potato--doesn't matter, as long as it's potato.

But although I often order it out, it's not something I make at home. Until now. My mother cut this recipe out of the newspaper and gave it to me months ago, but I just got around to trying it out this week. Believe it nor not, it's made from frozen (uncooked) hash browns! It's quick and easy, which are my middle names in the kitchen; tastes delicious, and it has no exotic ingredients that can't be found in even a small town grocery store--something that's especially important to me since I moved home to small-town rural Louisiana.

Ingredients:

  • medium onion, diced
  • 4 T butter
  • 5 cups of water
  • 4-5 bouillon cubes
  • 1 28-oz package of frozen hash browns (the uncooked kind)
  • 1 pound Velveeta
  • milk (if needed--I didn't need any)

Melt the butter in the pan, then add onion and cook until translucent and tender. You know me, I used dried onion flakes, but I did use the butter, it does add an element of flavor to the overall dish. So I melted the butter, then threw in 2 or 3 tablespoons of dried onion. Add the water and bouillon cubes--I used chicken stock powder, but you could use vegetable stock just as well. Add the hash browns--I added them frozen straight from the bag--and bring the whole mixture to a boil. Cover and turn down to simmer, stirring occasionally.


After about 20 minutes, check to see if the potatoes are tender.


Turn the burner up just a little, (still on low to medium) and add 1 pound of Velveeta--that's the small box or half of the larger box--I used a store brand knock-off.

Cook on low to medium, stirring frequently, until the cheese is melted.

Since bouillon and cheese can be salty, the only additional seasoning I added was some cracked black pepper. Once the cheese is added, you can add milk if needed--I didn't. I did let mine continue to simmer for about 10 minutes more, because we weren't quite ready to eat yet. Just be sure the burner is turned down very low so it won't scorch after the cheese is added. It does thicken a bit upon standing, you might need a little milk to thin it later or to reheat.

Variations:

I tasted it before I added the cheese, it was pretty good even then, although a little thin. If I wanted cream of potato soup with no cheese, I'd use less broth or stock, and add some milk or even half-and-half right at the end.

For baked potato soup, add some crumbled back and garnish with a dollop of sour cream and some chopped chives. I had none of the above on hand, so I didn't, but I think it would be a tasty addition!

Until next time, good cooking, and good eating!
This post is linked to:
Recipe Swap Sunday at Remodelaholic
Meatless Monday at My Sweet and Savory
Mouthwatering Monday at A Southern Fairytale
Tuesday at the Table at All the Small Stuff
Delicious Dishes at It's a Blog Party
Beat the Winter Blues Comfort Foods at Goodbye City, Hello Suburbs